Owner’s manual XMD1 XMD2 ■ Contents 1. 2. 3. 4. 5. PRECAUTIONS ................................. 2 FEATURES ........................................ 2 CONTROLS ....................................... 3 BUTTON TERMINOLOGY ................. 3 WIRED REMOTE CONTROL UNIT OPERATIONS .................................... 4 6. HANDLING COMPACT DISCS ......... 5 7. OPERATION ...................................... 6 8. TROUBLESHOOTING ..................... 10 9. ERROR DISPLAYS .......................... 11 10.
1.PRECAUTIONS 1. When it is very cold in the boat and the unit is used soon after switching on the heater, the disc and the optical components may become fogged and not operate properly. Wipe fogged discs with a soft cloth. Fogged optical components will naturally return to normal when the unit is left for about one hour after which it will operate normally. 2. When the boat is traveling in the rough seas the sound may skip as a result of intense vibrations and shock. 3.
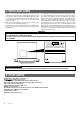
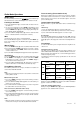
.CONTROLS Source Unit 4.
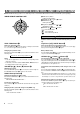
5.WIRED REMOTE CONTROL UNIT OPERATIONS ■ XMD1/XMD2 following operations are enabled by remote control with the Wired Remote Control Unit M101RC (sold separately).
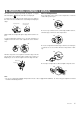
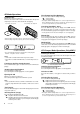
6. HANDLING COMPACT DISCS This unit has been designed specifically for playback of compact mark. No other discs can be played. discs bearing the To remove the compact disc from its storage case, press down on the center of the case and lift the disc out, holding it carefully by the edges. Removing the disc Note on Compact Discs Never stick labels on the surface of the compact disc or mark the surface with a pencil or pen.
7. OPERATION Note: • Be sure to read this chapter referring to the front diagrams of chapter 2. CONTROLS on page 3. Basic Operations Adjusting the Balance CAUTION When this unit is turned on, starting and stopping the engine of a boat with its volume raised to the maximum level may harm your hearing. Be careful about adjusting the volume. IMPORTANT Door must be totally closed to prevent water go into the set! 1) Press A-M button # and select “BAL”.
Radio Mode Operations FM Reception ® For enhanced FM performance the tuner includes signal actuated stereo control and Multipath noise reduction circuits. Listening to the Radio 1) Press the FUNC button 4 to select the radio mode, then the radio will be on. 2) To select a preset band, press the “BAND” button $,then select one of the preset bands such as FM1, FM2, FM3, or AM.
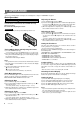
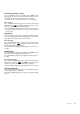
CD Mode Operations Fast-Forward and Fast-Backward Loading a Disc Open the door by push up the hook. Insert the disc into the CD insertion slot with its label side up and completely close the door, then the CD will start playing. For 5-inch (12 cm) CD For 3-inch (8 cm) single CD Press and hold the SRCH Left/Right button @.
Scan Play (Intro Music Scan) Press the SCN button 6, then the display shows “SCN”, then the CD will play the first 10 seconds of all the tracks of all CDs. Press the SCN button 6 again to disengage the unit from scan play. ∗ A scan play will start from the track following the one currently playing. Disc scan play Press and hold the SCN button 6 for 2 seconds or longer, then the ” and “SCN”, and plays the first 10 seconds display will show “ of the first song of all the CDs in the CD changer.
8.TROUBLESHOOTING Problem Power does not turn on. (No sound is produced.) Cause Solution Fuse is blown. Replace with a fuse of the same amperage. If the fuse blows again, consult your store of purchase. Incorrect wiring. Consult your store of purchase. Compact disc cannot be loaded. Another compact disc is already loaded. Eject the compact disc before loading the new one. Sound skips or is noisy. Compact disc is dirty. Clean the compact disc with a soft cloth.
9.ERROR DISPLAYS ■ To protect the system, this unit has been equipped with self diagnostic functions. If a fault arises, a warning is issued by various error displays. Follow the corrective measures and remove the fault. Error Display Corrective Measure This error display indicates that a fault has arisen in the mechanism of the source unit or CD changer (for example, the disc cannot be changed or ejected). ➜ Check the source unit and CD changer.
XMD1/XMD2
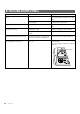
IMPORTANT DOOR MUST BE TOTALLY CLOSED TO PREVENT WATER GO INTO THE SET! OK NG LOADING A DISC OPEN THE DOOR BY PUSH THE HOOK. For 5-inch (12 cm) CD For 3-inch (8 cm) single CD PRESS THE RESET BUTTON FOR ABOUT 2 SECONDS WITH A THIN ROD.
Clarion Co., Ltd. 2000/3 (D•C) All Rights Reserved. Copyright © 2000: Clarion Co., Ltd.