
Owner's Manual

,.
Installation
and
Programming
Instructions
Instructions
d'lnstallation
et
de
Programmation
lnstalaci6n
e
lnstrucciones
de
Programaci6n
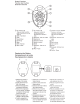
--~lel~- BLACK (Long)
Antenna
----BLACK
---ORANGE
3.5mm SWC
•
The
long
black
wire
is
the
antenna
and
should
not
be
connected.
BLACK
n
...
ong;
antenna
do
not
connect
REO
•
con11ect
to+
12V
ACC
BLACK
•
connect
to
ground
ORANGE·
do
no:
connect
NOIR
ILe
long
fl!)
antenrE
·
ne
pas
connecter
ROUGE
•
connecter
a
~
12V
ACC
NOIR
·
connecter
a
1a
tel're
ORANGE
ne
pas
connecter
NEGRO
1E!
cable
1argo1
antena
•
no
conectar
RCJO
•
conectarse
a +
12V
ACC
NEGRO
•
conectar
a
t1erra
NARANJA
·
no
conectar
For
best
results
keep
this
wire
stra1ght
and
pos1tloned
away
from
power
arnpi1f1ers
•
The
remote
that
comes
with
the
system
will
be
pre-programmed
to
the
rece1ver
at
the
factory
and
no
add1t1ona1
programming
IS
necessary.
The
orange
wire
needs
to
be
connected
only
when
programming
additional
remotes.
•
Up
to
8
remotes
can
be
programmed
to
the
receiver.
•
Transmission
distance
may
be
reduced
due
to
Interference
and
operat1ng
enVIronme'lt
•
Le
long
fll
no1r
est
le
fil
d'antenne
et
ne
devrait
pas
etre
branche
ou
raccorde
a
quo!
que
ce
so1t
Pour
de
meilleurs
resultats,
gardez
ce
fil
b1en
dr01t
et
a
l"ecart
de
tout
ampl1ficateur
de
pu1ssance
•
La
telecommande
fournie
avec
le
systeme
est
deJa
preprogrammee
pour
le
recepteur
a
1·
us1ne
et
aucune
programmat1on
additionnelle
n'est
necessaire.
Le
til
orange
n'a
besoin
d'etre
raccorde
que
lorsque
vous
programmez
des
telecommandes
additionnelles.
•
Vour
pouvez
programmer
jusqu'a
8
telecommandes
au
recepteur.
•
La
portee
de
transmission
peut
etre
affectee
et
redulte
seion
les
condl:lons
d
operatiOn
et
des
Interferences
presentes.
•
El
cable
largo
y
negroes
Ia
antena
el
cual
no
debe
conectarse.
Para
meJores
resultados
mantenga
este
cable
derecho
y
legos
de
amplificadores
de
poder.
•
El
remote
que
viene
con
el
sistema
estara
pre-program
ado
con
el
receptor
desde
Ia
fabnca
y
no
requiere
de
programaci6n
adicional.
El
cable
naranja
requiere
de
conectarse
solamente
cuando
se
programan
controles
adicionales.
•
Hasta
8
controles
remotes
se
pueden
programar
con
el
receptor
•
La
distancia de transmisi6n puede reducirse debido a interferencias del medio
en
el
cual
se
este operando.
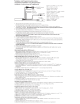
Marine
Radio
Models
with
8
pin
DIN
Connector
1.
With
the
radio
turned
off.
connect
the
8-pin
male
DIN
remote
connector
of
the
~~F'
rece1ver
module
1nto
t~e
"Wired
Remote
Connector"
at
the
back
of
the
rad1o.
No
other
connections
are
necessarv.
Power
and
ground
will
be
supplied
through
the
DIN
connector
,
2.
The
red
w1re,
the
short
black
w:re
and
the
3.5mm
Jack
are
not
used
w1th
manne
raa•os.
Modele
de
Radio
Marine
avec
Connectuer
DIN
a 8
broches
1.
Une
fois
Ia
radio
mise
hors
tens1on.
brancher
Ia
prise
DIN
male
a 8
broches
du
recepteur
du
MF1
dans
la
pnse
"Wired
Remote
Connector"
situe
en
arnere
de
Ia
radro.
Aucune
autre
connex1on
n·est
necessa1re.
Le
courant
sera
fourn1
via
le
ccnnecteur
DIN.
2.
Le
fil
rouge,
le
fil
noir
court
et
Ia
pnse
3.5mm
ne
sont
pas
util1ses
avec
les
rad1os
mannes.
Modelos
de
Radios
Marinos
con
Conectores
DIN
de
8
Pines
1.
Con
ei
radio
apagado,
enchufe
el
conector
DIN
macho
de
8
pins
del
a•
modulo
de
recepc16n
MF1
al
"Conector
para
Cor,trol
Remote
Alambnco"
ub1cado
en
Ia
parte
postenor
del
rad1o.
Cornente
y
t1erra
seran
summ1strados
por
el
conector
DIN.
2.
El
cable
rOJO.
ei
cable
negro
corte
y
el
conector
de
3.5mrn
:10
se
ut1l1zan
para
rad1os
mannos.
Car
Radio
Models
with
3.5mm
SWC
Jack
1.
With
the
rad1o
turned
of!.
connect
the
3
5m;ll
Jack
to
the
steenng
remote
1nput
con'lector
on
the
back
of
the
rad1o.
2.
Connect
the
red
wire
to+
12V
ACC
and
the
short
black
w:re
to
ground
.
3.
The
8
pin
male
DIN
connector
IS
not
used
w1th
car
rad1os.
Radio
d'Auto
avec
prise
3.5mm
SWC
(Commande
au
Volant
d'Origine)
1.
Une
to1s
Ia
radio
m1se
hors
tension.
brancher
Ia
pnse
3.5mm
dans
!e
connecteur
pour
!'entree
pour
comrnande
au
vo:ant
situe
en
arriere
de
ia
rad1o
2.
Raccorder
le
fil
rouge
a
un
courant
12V
ACC
et
le
fil
noir
court
a
Ia
m1se
a
1a
terre.
3.
Le
connecteur
DIN
8
broches
n·est
pas
util1se
avec
ces
rad1os.
Auto
Radios
con con
Entradas
de
3.5mm
1.
Con
e!
radio
apagado.
enchufe
e1
conector
de
3.5mm
a
Ia
entrada
pa:
a
rnandos
al
volante
en
Ia
parte
postenor
del
rad1c
2.
Conecte
ei
cable
roJO
a
una
toma
de
comente
d1:·ecta
de
12V
ACC
y
el
caoie
negro
corte
a
t1erra.
3.
El
conector
DIN
macho
de
8
pms
no
se
util1za
en
Auto
Radios.
Programming
additional
remote
controls
to
the
receiver
1.
With
the
rece1ver
fully
connected
and
the
radio
turned
off.
connect
the
orange
w1re
to
+
12V
DC.
2.
Push
any
button
on
the
remote
for
1
second
and
then
release.
3.
Disconnect
orange
wire
from
+
12V
DC
to
f1n1sh
the
programmmg
Programmer
des
telecommandes
additionnelles
au
recepteur
1.
Une
fo1s
que
le
recepteur
est
bien
raccorde.
ete1gnez
Ia
rad1o
et
branchez
le
fll
orange
a
une
source
Oie
:::ouram
12
Vee.
2.
Appuyer
sur
n'importe
quelle
touche
sur
Ia
telecorDrnande
pendant
1
Sf,Conde
et
relacher
3.
Debrancher
le
Iii
orange
du
courant
12
Vee
pour
term:ner
Ia
prograrnmat;on.
Programando
controles
remoto
adicionales
al
receptor
1.
Cuando
el
receptor
esta
cornpletamente
conectado
y
el
rad1o
apagado.
conecte
e:
cable
naranJa
a
una
torla
de
corriente
directa
de
12
Vee.
2.
Pres1one
cualqUier
bot6n
dei
control
remoto
por
1
segundo
y
::oere!o.
3.
Desconecte
el
cable
naranja
a
una
toma
de
cornente
d1recta
de
12
Vee
para
conclu1r
Ia
programac1on.