
User's Manual


ClarIDy HF RFID Reader
17/19 © Copyright 2008 ClarIDy Solutions, Inc. All rights reserved.
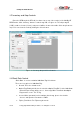
Write Block Data
After retrieving the data from the tag’s memory, user can change the contents with the
“Write” function. You can change the block data values in the grid cells, input the “From” & “To”
values (means: from block-3 to block-3) and click the “Write” button to write the new values into
the tag’s memory, see figure 18.
Figure 18. Update data of block-3 by “Write” function.
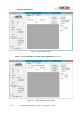
3.4 NFC Control
To do the NFC control, there should have two ClarIDy HF RFID Readers. Execute two
“ClarIDy HF Demo” programs. Connect both of them by “Port” 0 and “Port” 1 with “USB” Type
respectively. Specify one ClarIDy HF RFID Reader to do the “Send” process as figure 19 and the
other to do the “Receive” process as figure 20. Define the “FilePath” on the “Receive” side and
click “Receive” button for receiving. Define the “FileName” on the “Send” side and click “Send” to
start sending file data.