ClarIDy HF RFID Reader ClarIDy HF RFID USB Reader User’s Manual M/N: HNM001 Version: A.2 2008-08-15 ClarIDy Solutions, Inc. 1/19 © Copyright 2008 ClarIDy Solutions, Inc. All rights reserved.
ClarIDy HF RFID Reader Copyright Notice © Copyright 2008 ClarIDy Solutions, Inc. All rights reserved. No part of this document may be reproduced without the prior written permission of ClarIDy Solutions, Inc. Disclaimer The information of this document is subject to change without notice and does not represent a commitment on any part of ClarIDy Solutions, Inc. Trademarks Microsoft, Windows, Visual Studio, .NET Framework, and CSharp (C#) are registered trademarks of Microsoft Corporation.
ClarIDy HF RFID Reader Change Log Revision Date Author Description A.1 2008.07.21. Andy Chen Create the ClarIDy HF RFID Demo Program User’s Manual. A.2 2008.08.15. Horng-Ji Chen Change the control panel and add NFC file transfer functions. 3/19 © Copyright 2008 ClarIDy Solutions, Inc. All rights reserved.
ClarIDy HF RFID Reader Table of Contents 1. Introduction .................................................................................................................. 5 2. Installation ................................................................................................................... 6 2.1 Setup the USB Driver .................................................................................................................... 6 2.2 Setup the Demo Program ................................
ClarIDy HF RFID Reader 1. Introduction This document describes the demo program (ClarIDy_HF_Demo.exe) for ClarIDy HF RFID Reader. The demo program provides configuration controls, “Inventory”, “Block Data”, and “NFC” functions. User can use this application to control the ClarIDy HF RFID Reader to communicate with ISO14443A, ISO14443B, ISO15693, and Sony FeliCa RFID tags. ClarIDy HF RFID Reader also provides NFC (Near Field Communication” functions to have contactless file transfer capability.
ClarIDy HF RFID Reader 2. Installation 2.1 Setup the USB Driver First time using the ClarIDy’s HF FRID Reader (USB Interface), you must install the driver (RFIDUSBDriver.exe). Please directly connect the ClarIDy HF RFID Reader to the USB port of the computer, or use the UHF entension cable to connect both ClarIDy HF RFID Reader and the USB port of the computer. The Windows system will detect the ClarIDy HF RFID Reader as a new device and popup the device driver setup dialog. Please ignore and close it.
ClarIDy HF RFID Reader Figure 2 Figure 3 7/19 © Copyright 2008 ClarIDy Solutions, Inc. All rights reserved.
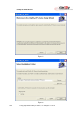
ClarIDy HF RFID Reader Figure 4 2.2 Setup the Demo Program Execute the Setup.exe step by step as the following figures: 1. Click “Next” from the “ClarIDy HF Setup” dialog, as figure 5. 2. Click “Next” while the “Select Installation Folder” was specified, as figure 6. 3. Click “Next” on the “Confirm Installation”, as figure 7. 4. System will show the “Installing ClarIDy HF Demo” as figure 8. While the “Installation Complete” was shown, click “Close” to finish the installation, as figure 9.
ClarIDy HF RFID Reader Figure 5. Figure 6. 9/19 © Copyright 2008 ClarIDy Solutions, Inc. All rights reserved.
ClarIDy HF RFID Reader Figure 7. Figure 8. 10/19 © Copyright 2008 ClarIDy Solutions, Inc. All rights reserved.
ClarIDy HF RFID Reader Figure 9. 11/19 © Copyright 2008 ClarIDy Solutions, Inc. All rights reserved.
ClarIDy HF RFID Reader 3. Demo Program Operation Guide The following sections will describe the usage of the ClarIDy HF Demo application. 3.1 Configuration Control The main form on the left hand side is the configuration control of the ClarIDy HF RFID Reader, as figure 10. User can use this form to configure the operational environment of the Reader. Figure 10. Configuration Control The initial state of the Reader is “Disconnected”.
ClarIDy HF RFID Reader Figure 11. Connect to the reader Figure 12. Change Protocols. 13/19 © Copyright 2008 ClarIDy Solutions, Inc. All rights reserved.
ClarIDy HF RFID Reader 3.2 Inventory and Stop Controls Place the “RFID tag in the RF field (less than 4 cm on top of the reader) of the ClarIDy HF RFID Reader. Click “Inventory” button to read the tag UID, see figure 13. The unique tag ID (“UID”), number of reads (“Count”), and protocol will be shown on the table. Click “Stop” button to stop it. You can clear the result by clicking the “Clear” button. Figure 13. Inventory, Stop and Clear Controls 3.
ClarIDy HF RFID Reader Figure 14. Block Data Control Note: To access tag data, you must get the tag UID first, figure 15. Figure 15. Block Data Control (Get UID) 15/19 © Copyright 2008 ClarIDy Solutions, Inc. All rights reserved.
ClarIDy HF RFID Reader Read Block Data After the Tag UID is identified, you can click the “Read All” button to retrieve all block data in the tag’s memory, see figure 16. If the system pops up the dialog as figure 17, suppose the tag information could not be accessed properly, enter the “Block Count” such as 27, and “Size (Bytes)” such as 4 for the ISO 15693 tag and click “Read All” again. If the error message still occurred, reduce the “Block Count” and try again. Figure 16.
ClarIDy HF RFID Reader Write Block Data After retrieving the data from the tag’s memory, user can change the contents with the “Write” function. You can change the block data values in the grid cells, input the “From” & “To” values (means: from block-3 to block-3) and click the “Write” button to write the new values into the tag’s memory, see figure 18. Figure 18. Update data of block-3 by “Write” function. 3.4 NFC Control To do the NFC control, there should have two ClarIDy HF RFID Readers.
ClarIDy HF RFID Reader Figure 19. NFC Control on Send Side. Figure 20. NFC Control on Receive Side. If the file data was sent successfully, the transfer status will show “Send Success” on the Send 18/19 © Copyright 2008 ClarIDy Solutions, Inc. All rights reserved.
ClarIDy HF RFID Reader side. If the file type is “jpg” and receiving successfully, the transfer status will show “Receive Success”, and will display the received image on the Receive side, figure 21. Figure 21. NFC Control to display image file. 3.5 Disconnect Control Click “Disconnect” button to close the reader connection and USB communication, see figure 22. The “Disconnect” button will be disabled and the “Connect” button will be enabled after then. Figure 22. “Disconnect” control.
Federal Communication Commission Interference Statement This equipment has been tested and found to comply with the limits for a Class B digital device, pursuant to Part 15 of the FCC Rules. These limits are designed to provide reasonable protection against harmful interference in a residential installation. This equipment generates, uses and can radiate radio frequency energy and, if not installed and used in accordance with the instructions, may cause harmful interference to radio communications.