
User's Guide

DOC ID - 1563 • Rev 09 12 / 17
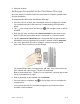
5. Add your doorbell.
Setting up the doorbell in the ClareVision Plus app
Once the camera is installed, follow the steps below to complete doorbell setup
and final installation.
To setup the doorbell in the ClareVision Plus app:
1. Once the LED on the front of the doorbell is solid red, configure the camera.
For troubleshooting and LED status see Troubleshooting and light status
below.
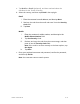
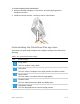
2. Tap in the bottom menu, and then tap in the top-right corner to add the
doorbell.
3. Scan the QR code, and then select Video Doorbell from the menu screen.
Note: Ensure that your mobile device is connected to a 2.4 GHz network.
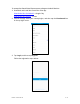
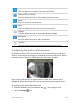
4. Tap the Connect to a Network button. Ensure that the encryption listed is
WPA/WPA2, enter the password for your Wi-Fi network, and tap Generate.
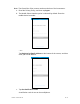
5. Tap on the generated QR code to enlarge it, and then hold your mobile
device 4-6 inches from the lens of the doorbell.
The doorbell beeps when it recognizes the QR code. Once connected to the
Wi-Fi network the camera says, “The Wi-Fi is connected”.
Note: If the doorbell says, “The Wi-Fi is not connected,” tap back and re-enter
the Wi-Fi password to try again.
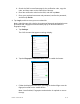
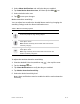
6. Enter a password for the doorbell and tap Activate.
7. Once activation is completed, tap in the top-right corner to complete the
setup process.
You can now view live and recorded footage from your new Clare Video
Doorbell. Finish installation.