
Installation guide

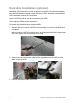

4 ClareVision Network Video Recorder Installation Guide
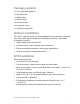
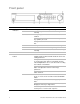
Front panel
No.
Name
Setting
Function Description
1
Status
indicators
POWER
Turns green when NVR is powered up.
READY
The LED is green when the device is running
normally.
STATUS
The light is green when the IR remote control is
enabled.
The light is red when the function of the composite
keys (SHIFT) are used.
The light is out when none of the above conditions are
met.
ALARM
The light is red when there is an alarm occurring.
HDD
Blinks red when HDD is reading/writing.
Tx/Rx
Blinks green when network connection is functioning
normally.
2
DVD-R/W
Slot for DVD-R/W
3
Control
buttons
DIRECTION
In Menu mode, the direction buttons are used to
navigate between different fields and items and select
setting parameters.
In Playback mode, the Up and Down buttons are used
to speed up and slow down record playing, and the
Left and Right buttons are used to move the recording
30s forwards or backwards.
In the image setting interface, the Up and Down
button can adjust the level bar of the image
parameters.
In Live View mode, these buttons can be used to
switch channels.
ENTER
The Enter button is used to confirm selection in menu
mode; or used to check checkbox fields and ON/OFF
switch.
In Playback mode, it can be used to play or pause the
video.
In Single-frame Play mode, pressing the Enter button
will play the video by a single frame.
In Auto Sequence View mode, the buttons can be
used to pause or resume auto sequence.