
Operation Manual


Page 9 of 25
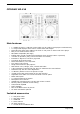
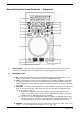
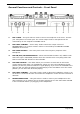
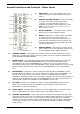
General Functions and Controls – Front Panel
1. MIC 1 JACK – This jack socket is used to connect a microphone to the mixer. Connect
your microphone via 6.3mm jack. The volume output level for microphone will be
controlled by its own respective VOLUME control.
2. MIC LEVEL CONTROL – These rotary knobs controls the output volume of
MICROPHONE 1 & 2. However master volume is controlled by the MASTER VOLUME
CONTROL on the mixer.
3. MIC TONE CONTROL – This rotary knob control the frequency response of the
Microphone.
4. MIC ON/OFF/TALKOVER SWITCH – When switched left the MIC is off, middle is ON
and to the right is TALKOVER position where the sound level for everything other than
that from the MIC will decrease to around 20dB.
5. CUE PAN CONTROL – This slider allows you to monitor a cued track as well as the
current playing track from your headphones. When you move the CUE PAN to the left
position you will only hear the Channel 1 signal playing. If you move the CUE PAN to the
right you will only hear the Channel 2 signal playing. If the CUE PAN is set to the centre
position you can hear both Channels playing.
6. CUE LEVEL CONTROL – This rotary knob is used to adjust the headphone volume. Turn
the knob in a clockwise direction to increase the headphone volume and anti clockwise to
decrease.
7. HEADPHONE SOCKET – This jack socket is used to connect your headphones to the
device allowing you to monitor the cue channel. Always be sure the CUE LEVEL VOLUME
is set to minimum before you plugging in the headphones.