
Operation Manual

Page 10 of 25
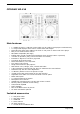
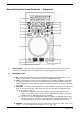
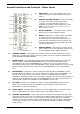
General Functions and Controls – Mixer Panel
1. USB PORT 1 - This is the USB port where you
insert your USB 2.0 mass storage device (up to
32Gb).
2. MASTER VOLUME CONTROL – This rotary knob
is used to control the master output level
(volume). To avoid distorted output try to
maintain an average output signal level +4 dB.
NOTE: Be sure this volume control is always set to zero
before turning the unit on.
3. BOOTH CONTROL – This rotary knob is used to
adjust the level of the BOOTH outputs.
4. RELAY– This button is used to switch the RELAY
on and off. The left and right players will
automatically be in single play mode when the
relay function is activated. On the contrary, the
left and right players will automatically be in the
continuous play mode.
5. MASTER METER – This button is used to choose
either master level or the individual channel level
on the CHANNEL LEVEL display indicators.
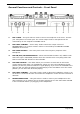
6. CHANNEL FADER – These faders are used to control the output signal of any source
assigned to its particular channel. However, master volume is controlled independently
by the MASTER VOLUME CONTROL.
7. FADER START – These ON/OFF switches activate the FADER START function for each
channel. When activated the CROSSFADER can be used to stop and start a track
automatically. EG: If the CROSSFADER is in position CH1, the CH2 cued track will
automatically start playing if the CROSSFADER is then moved towards CH2. CH2 will stop
playing and go back to the last cued point if the CROSSFADER is then moved back to
CH1.
8. CROSSFADER – This fader is used to blend the output signals of CHANNELS 1 and 2
together. When the fader is in the full left position, the output signal of CHANNEL 1 will
be controlled by the master volume level. The same fundamentals will apply for
CHANNEL 2. Sliding the fader from one position to another will vary the output signals of
channels 1 and 2 respectively. When the CROSSFADER is set in the centre position, the
output signals of both the CHANNEL 1 and CHANNEL 2 will be even.
9. CF CURVE – Allows you to adjust the “shape” of the CROSSFADER response from a
gentle curve for smooth long running fades, to the steep pitch required for top
performance cut and scratch effects.
10. LEVEL METER – The dual LED’s indicators are used to detail either the master output
level, a combination of the master output level or the PGM monaural level.
11. CHANNEL EQ CONTROL – Both of the channels include a three-band signal EQ. These
controls are used to increase or decrease the HI, MID or LOW frequencies by turning the
desired knob from left to right. You can adjust the signal output between -35dB and
+10dB. You can also activate the KILL EQ by pressing either the HI, MID or LOW knobs
to reduce the frequency to the lowest level “-35dB”. A red LED will indicate that KILL
mode is active.