
Installation guide


44 Implementing Windows Terminal Server and Citrix MetaFrame on IBM ^ xSeries Servers
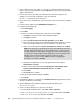
e. In the root folder of the Office Disc 1, select setup.exe and click Open to insert
setup.exe in the command line of the installation dialog.
f. On the command line, add the following two parameters after setup.exe, separated by
spaces:
TRANSFORMS="path\TermSrvr.mst"
This command identifies the Terminal Server transform for Setup to use during
installation.
g. Specify the correct path to the MST file:
/l* "%WINDIR%\Office 2000 Setup(0001).txt"
This optional command places the Setup log file in the Windows folder, rather than in
the %TEMP% folder, so that it is not deleted automatically by Windows.
h. Click Finish to start the installation program.
6. After the program is installed, click Close on the Add/Remove Programs window.
By default, the Terminal Server transform (TermSrvr.mst) does not install any Office
Assistants. After running Office Setup, you can install the Motionless Office Assistant
(Stillogo.acs) included in the Office Resource Kit. This Office Assistant uses no animation, so
there is minimal network traffic between the Terminal Server computer and the Terminal
Client computer. For information about installing the Motionless Office Assistant, see Terminal
Server Tools in the Office 2000 Resource Kit Toolbox.
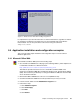
5.4.2 Microsoft Office XP
This suite of programs is the latest Office release from Microsoft. Office XP Setup detects that
it is being run under Terminal Services and it preconfigures all the proper options. For this
detection to occur on Windows 2000 Server, Application Server mode must be enabled.
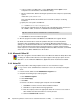
5.4.3 Notes R5
Notes R5 provides e-mail and groupware services to users. Follow these steps:
1. Log on to the server as Administrator and ensure no users are currently accessing the
server.
2. In Control Panel, double-click the Add/Remove Programs icon.
3. Complete the following steps to add a program:
a. Click Add New Programs.
b. Click CD or Floppy.
c. Click Next.
d. Run the Lotus Notes 5 install program setup.exe from the CD-ROM.
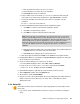
i. Click Next to continue on the first Notes installation window.
ii. Click Yes to accept the Notes licensing agreement.
iii. Enter the company name in the appropriate fields. Do not enter a user’s name in
either field because data entered here is seen by all users.
iv. Select the Shared install check box.
Tip: The character after the forward slash is a lowercase letter L.