
User Manual
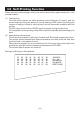
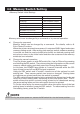
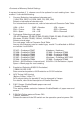

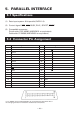
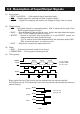
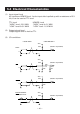
Table Of Contents
- AD-1192 Instruction cover.pdf
- AD-1192 Instruction Manual.pdf
- AD-1192 Instruction cover.pdf
- AD-1192 Instruction Manual.pdf
- WEEE MARK
- CE Marking Declaration of Conformity
- FCC Declaration of Conformity
- Compliance Statements
- SAFETY PRECAUTIONS
- THE TABLE OF CONTENTS
- 1. INTRODUCTION
- 2. TYPE CLASSIFICATIONS
- 3. EXTERNAL APPEARANCE AND PART DESCRIPTIONS
- 4. OPERATIONS
- 5. PARALLEL INTERFACE
- 6. SERIAL INTERFACE
- 7. DIP SWITCH SETTING
- 8. PRINT CONTROL FUNCTION
- 9. CHARACTER CODE TABLE
- 9.1 ASCII + 910 Emulation (International)
- 9.2 910 Emulation (Japan)
- 9.3 Codepage PC437 (USA, Standard Europe)
- 9.4 Katakana
- 9.5 Codepage PC858 (Multilingual)
- 9.6 Codepage PC860 (Portuguese)
- 9.7 Codepage PC863 (Canadian-French)
- 9.8 Codepage PC865 (Nordic)
- 9.9 Codepage PC852 (Eastern Europe)
- 9.10 Codepage PC866 (Russian)
- 9.11 Codepage PC857 (Turkish)
- 9.12 Codepage WPC1252 (Windows Latin1)
- 9.13 Codepage PC864 (Arabic)
- 9.14 Codepage PC869 (Greek)
- 9.15 International Character Code Table
- 10. EXTERNAL DIMENSIONS
— 19 —
NOTE
Before turning the printer power on, restore the DIP switch No. 4 to the former position.
4.6 Memory Switch Setting
<Memory Switch Initial Setting>
Memory switch can be changed by a command or by manual operation.
a) Change by command
Memory switch can be changed by a command. For details, refer to 8.
Print Control Function.
When the printer receives the command, it outputs a BUSY signal and enters
memory setting mode. After writing into memory switch, software resetting
is carried out and the receive buffer/print buffer are cleared causing each
set value to return to the initial value and then the contents of the memory
switch(es) are reloaded.
b) Change by manual operation
Turn the printer power on with DIP switch No. 4 set to ON and by pressing
and holding the SEL switch. The printer prints the information on the current
memory switch setting and then enters the Change Setting mode.
In this case, the POWER lamp blinks at 1-second intervals while the SEL
lamp is kept turned off and BUSY signal outputted.
Using the SEL switch and LF switch, choose one of the options for each
setting item. Then memory switch can be set or changed. Setting items
and options are printed each time the switch is pressed.
The SEL switch allows the option being printed to be determined as the set
value for current setting item, advancing to the next option item. The LF
switch allows the option currently being printed to be deselected among
the same setting items and the next option item to be printed.
To fix the value set by the memory switch when the option item of the last
setting items is selected, press the SEL switch. To restart setting from the
first setting items, press the LF switch.
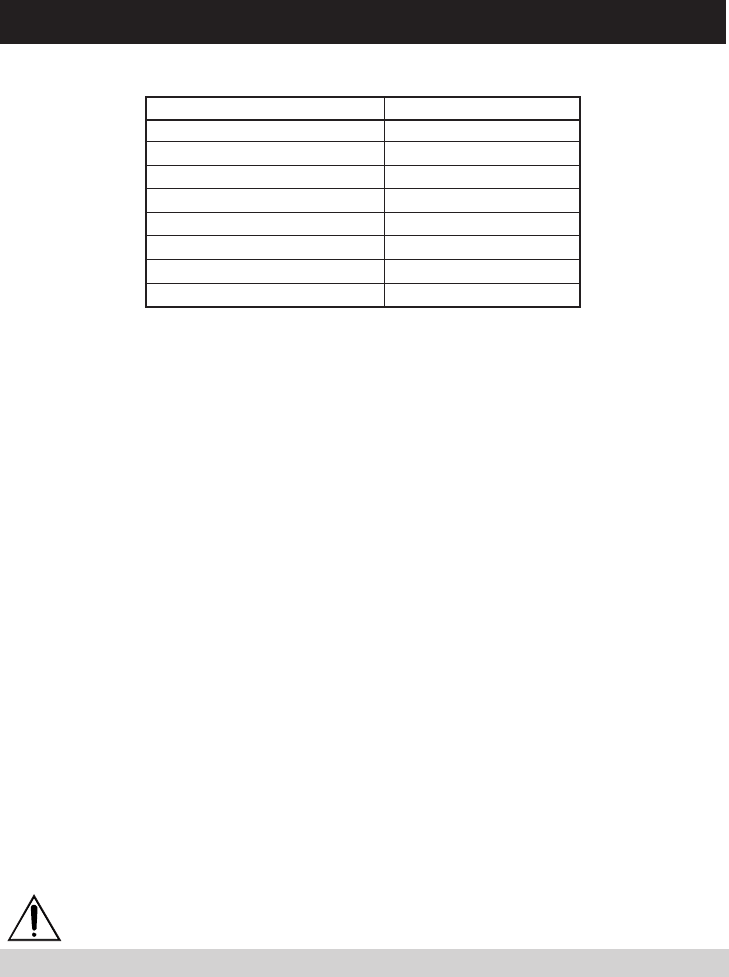
Japan (910JPN)
International character selection Japanese
Code page 910-compatible (Japan)
Emulation CBM910
Ack timing After
Paper-near-end selection Valid
SEL/DESEL at power ON SEL
Busy signal clear timing Standard
Buffer Size (Serial I/F) 2k bytes