
User Manual
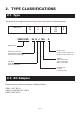

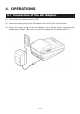

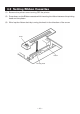
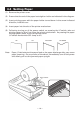
Table Of Contents
- AD-1192 Instruction cover.pdf
- AD-1192 Instruction Manual.pdf
- AD-1192 Instruction cover.pdf
- AD-1192 Instruction Manual.pdf
- WEEE MARK
- CE Marking Declaration of Conformity
- FCC Declaration of Conformity
- Compliance Statements
- SAFETY PRECAUTIONS
- THE TABLE OF CONTENTS
- 1. INTRODUCTION
- 2. TYPE CLASSIFICATIONS
- 3. EXTERNAL APPEARANCE AND PART DESCRIPTIONS
- 4. OPERATIONS
- 5. PARALLEL INTERFACE
- 6. SERIAL INTERFACE
- 7. DIP SWITCH SETTING
- 8. PRINT CONTROL FUNCTION
- 9. CHARACTER CODE TABLE
- 9.1 ASCII + 910 Emulation (International)
- 9.2 910 Emulation (Japan)
- 9.3 Codepage PC437 (USA, Standard Europe)
- 9.4 Katakana
- 9.5 Codepage PC858 (Multilingual)
- 9.6 Codepage PC860 (Portuguese)
- 9.7 Codepage PC863 (Canadian-French)
- 9.8 Codepage PC865 (Nordic)
- 9.9 Codepage PC852 (Eastern Europe)
- 9.10 Codepage PC866 (Russian)
- 9.11 Codepage PC857 (Turkish)
- 9.12 Codepage WPC1252 (Windows Latin1)
- 9.13 Codepage PC864 (Arabic)
- 9.14 Codepage PC869 (Greek)
- 9.15 International Character Code Table
- 10. EXTERNAL DIMENSIONS

— 16 —
OK NO GOOD NO GOODOK
4.4 Setting Paper
(1) Remove the printer cover.
(2) Ensure that the end of the paper is straight or incline as indicated in the diagram.
(3) Insert printing paper with the paper holder turned down in the arrow-indicated
direction, hold the core.
(4) Insert paper into the slot of the printer mechanism.
(5) Following turning-on of the power switch, as pressing the LF switch, take out
printing paper by 5 to 6 cm from the printer mechanism. As passing the paper
through paper outlet, mount the printer cover.
(LF switch works when SEL lamp is off.)
Note: Paper, if held aslant at the paper feed or the paper discharge side, may cause
paper jamming. On occurrence of the above, immediately turn off the power
and slowly pull out the jammed paper upright.
Paper holder