CRI CARPET INSTALLATION STANDARD EFFECTIVE OCTOBER 1, 2009 First Edition
The Carpet and Rug Institute 730 College Drive P.O. Box 2048 Dalton, Georgia 30722-2048 706/ 278-3176 COPYRIGHT PENDING DISCLAIMER The Carpet and Rug Institute assumes no responsibility and accepts no liability for the application of the principles or techniques contained in this standard.
CONTENTS Foreword . . . . . . . . . . . 1 . . . . . . . . . 2 Scope . . . . . . . Applicable Documents and References . . Terminology . . . . . . Tools and Materials . . . . Storage and Handling . . . . Planning . . . . . . Site Conditions – All Installations . . Substrates . . . . . . Testing Concrete Substrates . . . Relaxing/Conditioning Carpet . . . Ventilation . . . . . . Carpet Seam Edge Preparation . . . Direct Glue-Down Installation . . . Double Glue-Down Installation . . .
FOREWORD This minimum standard requirement for installation of commercial carpet is based upon reliable principles and procedures developed through practical experience, research, and information obtained from manufacturers, retailers, installers, end users, testing laboratories, and others who have specialized expertise. This minimum standard requirement does not include carpet performance characteristics.
Acknowledgements This minimum standard requirement was prepared under the direction of the Installation Issues Management Team of the Carpet and Rug Institute and in cooperation with experts in the carpet installation and related fields.
CRI Carpet Installation Standard 2009 1. Scope This document establishes minimum industry standards for commercial carpet installation. 2. Applicable Documents and References 2.1 Carpet and Rug Institute References: The Carpet Primer * Characteristics of Patterned Carpet Technical Bulletin* * Downloadable from The Carpet and Rug Institute web site www.carpet-rug.org 2.
required to be unrolled and allowed to lie flat immediately upon arrival at the installation site. CAUTION: Failure to observe the preceding requirements may result in the following: 1) Contamination from soil, grease and/or oil 2) Delamination 3) Dimensional changes 4) Permanent indentation 5) Development of wrinkles and bubbles 6) Pile reversal 7) Roll-crushing 8) Creases 9) Pattern distortion 6. Planning All facets of the installation are to be coordinated.
Allow tolerance by cutting carpet 3-4 inches (75-100 mm) longer than the area measurement Carpet pile direction for each area Name of manufacturer, style, backing system and color of carpet for each area Large scale drawings showing treatment of step areas or other detail work Location and type of expansion joints and edge transitions. Type of wall base in each area. 6.2 Planning for Seams - Keep seams to a minimum. Position seams so that, where possible: they run the length of the area.
7. Site Conditions – All Installations 7.1 Substrate Conditions – The owner or general contractor is responsible for providing an acceptable substrate for the specified installation. Note: Installing carpet prematurely before other trades have completed their work will result in problems with: overall appearance, visible damage, soiling, adhesive failure, delamination and dimensional stability. These conditions may not be immediately evident. Refer to Section 16-Protecting Indoor Installations. 7.
7.5 Wood - Wood substrates are required to be structurally sound, flat, dry and securely anchored. Substrates, such as plywood, hardwood, particleboard, oriented strand board, or other materials, are required to be flooring grade (APA approved) and installed according to manufacturer specifications. Irregularities, imperfections and joints are required to be properly patched and prepared. It is required that all protrusions be properly prepared. 7.
cementitious leveling or patching compound. Follow the open time recommendations of the adhesive manufacturer when adhering carpet to nonporous substrates. 8.2 Slate and Brick - These surfaces may be too rough and uneven for most installations and may require refinishing and/or smoothing before installing carpet. 8.3 Asphalt – It is required that asphalt surfaces be clean, dry, free from excessive oil and grease, and in good condition.
9.4 Testing for Alkalinity - Testing the pH at the surface of a concrete slab must be conducted in accordance with the latest edition of ASTM F 710 “Standard Practice for Preparing Concrete Floors to Receive Resilient Flooring”. Note: Preparing the surface of a concrete slab for pH testing can be problematical. Make sure the concrete surface is adequately cleaned of adhesives, curing compounds etc. When pH readings are less than 8.5, it may be an indication of a residue remaining on the concrete surface.
Note: Although “row-cutting” both edges is preferred, other trimming techniques may be more suitable on some carpet. Many carpets do not lend themselves to all methods of cutting. Some woven carpet selvages are not to be trimmed. Contact carpet manufacturers for specific recommendations. 12.2 Sealing Edges – Regardless of installation method, most carpet requires an edge protective material be introduced between the edges to be joined.
13.2.2 Painted Surfaces - Painted surfaces may be suitable for adhesive application; however, contact the carpet and adhesive manufacturer for recommendations. CAUTION: Lacking documented evidence to the contrary, e.g., current testing, assume that all paints contain lead and treat them in the manner prescribed by existing local, state, and Federal lead abatement regulations. 13.2.
13.3.1 Trowel Selection - Select the appropriate adhesive and trowel notch configuration recommended by the carpet manufacturer and/or adhesive supplier, or refer to the list shown in Table II as a minimum. 13.3.2 Adhesive Application - Spread floor adhesive uniformly over the substrate with an appropriate trowel, leaving ridges of sufficient height to achieve full and complete coverage of both the substrate and carpet backing. Trowel notches wear down during use.
Figure 1 13.6 Rolling – After the recommended amount of adhesive has been applied to the floor and the prescribed open time has been allowed, the carpet is carefully placed into the adhesive. To insure an adequate bond, It is then required that the carpet be uniformly pressed into the adhesive using a roller designed for this purpose.
14.4 Layout –Where applicable, allow for pattern repeat. Align all carpet breadths to their proper position and trim seams. Take care to avoid cutting into cushion under seams. 14.5 Adhesives and Trowel Notch Sizes - When applying cushion to floors and carpet to cushion, select the appropriate adhesive and trowel notch size recommended by the carpet, cushion and adhesive manufacturer. If recommendations are not available, refer to the general minimum guidelines in Table II.
15.5 Hook and Loop Technology - This specialized installation system uses hooked tape and a looped fabric to cover the entire underside of the carpet. The system involves detailed and specific installation practices. Consult the carpet manufacturer for recommended installation procedures. 16. Stretch-in Installation This method involves installing carpet under tension over a separate cushion, using tack strip fastened at all walls and other vertical abutments around the perimeter of the area. 16.
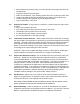
of fiber cushions, secure seams with appropriate vinyl-coated cloth cushion tape per the carpet cushion manufacturer’s recommendations. 16.4 Seaming – The seaming method depends upon carpet construction and backing type. Always follow manufacturer recommendations for seaming. Common seaming methods include: hot-melt tape hand sewing tape and latex 16.5 Power Stretching – Power-stretch carpet following the eight step procedure described in Figure 2. Firmly hook onto tack strip.
FIGURE 2 - Stretch Diagram for Tufted Carpet In the absence of carpet manufacturer stretch recommendations, use the diagram below. Step 8 D C Step 6 Step 7 Step 3 Carpet direction Step 2 Step 4 Step 1 B A Step 5 Step 1 - Hook onto tack strip, approximately three feet in both directions, along corner A. Step 2 - Power stretch at approximately 15o angle from wall A-B and hook onto tack strip at corner C. Step 3 - Hook and secure onto tack strip with knee kicker along wall from A to C.
16.5.1 Using a Mechanical Stretching Device (i.e. Power Stretcher) is Mandatory. Devices used as a substitute for, or an attachment to such devices that penetrate through the carpet backing may cause injury, damage carpet or substrates, or result in inadequate stretch. Such devices are not acceptable. Mechanical stretching device – A tool used to stretch carpet during the installation process.
Note: Carpet placed into transition moldings requires edge sealing to prevent raveling. 17. Carpet on Stairs 17.1 Preparation – It is required that the stair tread, riser and stair nose should be clean, dry and structurally sound. The stair nose return should be rounded ¾-1 inch (19 to 25 mm) to prevent sharp stair edges from cutting carpet and/or cushion, and to provide proper carpet contact for adhesive installations.
18.2 Adhesive Application - Follow manufacturer’s recommendations. Generally, a thin film of pressure-sensitive adhesive is used to prevent lateral movement of modules. 19. Patterned Carpet Installations 19.1 Uninstalled Patterned Carpet - Carpet is a textile fabric subject to inevitable processing variations in the four pattern conditions: bow, skew/bias, elongation variations and trueness of edges. Measurement of these four conditions is performed on an uninstalled breadth of carpet.
19.6 Carpet Layout – Lay carpet out according to the seaming diagram. Unroll carpet and allow it to relax for a minimum of 24 hours before installation. Pre-cutting of carpet is recommended. Note: Patterned carpet may require additional material for proper pattern matching. 19.7 Seam Preparation – Refer to Section 8. 19.8 Pattern Adjustment - Pattern adjustment during installation is possible and should be anticipated. 19.9 Pattern Alignment - Match the pattern at the midpoint of the seam’s length.
21. Outdoor Carpet and Synthetic Turf Installation - Outdoor carpet installed with adhesives creates conditions quite different from those encountered indoors. Both carpet and adhesive are subjected to extreme weather and traffic. Installation surfaces are much more varied and often are uneven. Note: Installing artificial turf on athletic fields is a highly specialized procedure and is outside the scope of this standard. Consult the manufacturer for specific installation instructions. 21.
21.3.5 Asphalt – Asphalt requires special considerations as a substrate. Follow adhesive and carpet manufacturer’s recommendation. 21.3.6 Swimming Pools - Regardless of the surface encountered, indoor swimming pools should be drained and dry before installing outdoor carpet. Do not use outdoor pools during carpet installation. Remove fungus or algae from the surfaces to be covered. Ventilate indoor pool areas to reduce excess humidity.
Appendices 24
Table I Adhesives – Common Types Used in Carpet Installation __________________________________________________________________________________________________________________________________________________________________________________________________________________ ______ A. Carpet Floor Adhesives 1. Latex Adhesive: Common name for adhesives used to install broadloom carpets, excluding those with vinyl backing, either directly to a substrate or over underlayment and cushion.
Table II Trowel Size – Minimum Guidelines Direct Glue Down Trowel Size (in inches*) Notch Width Notch Depth Space Between Notch Shape Polypropylene, woven mesh Secondary 1/8 1/8 1/8 1/8 1/16 1/8 V U Unitary, no secondary fabric 1/8 1/8 1/8 1/8 1/16 1/8 V U Woven carpet 1/8 1/8 1/8 1/8 1/16 1/8 V U Type Carpet Back Non-woven Refer to manufacturer recommendations Hot-melt polymer 1/8 1/8 1/16 V Woven jute secondary Attached cushion 3/32 3/32 3/32 V 3/32 3/32 3/32 V Vinyl-b
Guidelines for Maintaining Indoor Air Quality During Carpet Installation During installation, maintain air circulation by operating the HVAC system at full capacity. Vacuum old carpet thoroughly before removal to minimize the amount of dust particles. Note: When selecting a new vacuum cleaner, look for units bearing the CRI Seal of Approval “Green Label.” This label identifies vacuums that have been tested and meet minimum standards for dust containment, soil removal, and carpet appearance retention.
28
29
30
DEFINITIONS OF TERMS adhesive – A substance that dries to a film capable of holding materials together by surface attachment. [Applying adhesive to the floor normally is accomplished with a trowel, airless spray, or roller.] adhesive transfer – When installing carpet, the degree of coverage and/or penetration of the applied adhesive into the back of carpet, while maintaining full coverage of the floor.
open time – The earliest time interval between the spreading of adhesive on a substrate and the placement of a floor covering material into the adhesive for bonding. patching – Floor preparation process of filling holes, cracks, and imperfections, etc., in a floor substrate prior to installation of carpet pattern bow – A distortion visible as wavy or crooked pattern lines when viewed across carpet width. pattern elongation – A variation of cumulative pattern measurements from one breadth to the next.
stretch-in – Installation method whereby carpet is placed over separate carpet cushion and is secured in place, under tension, using a power stretcher (mechanical stretching device). tack strip – Wood strip fastened to the floor near the walls of a room, containing either two or three rows of pins angled toward the walls on which the carpet is stretched and secured in a stretch-in installation.