
Owner`s manual

Page 45
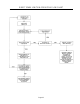
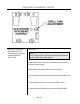
INSTRUCTIONS
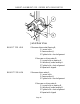
1. Loosen bolts number one (1) through five (5).
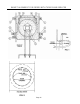
2. Place pin “A” in position shown in figures 1 and 2.
3. Check pins “B” at position shown in figures 1 and 2 for equal
clearance.
4. If pin “B” clearance is unequal, adjust at nut #6.
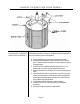
5. When clearance at pin “B” is correct, tighten bolts #1 in the
following order, as viewed from rear of dryer, top right, bottom
left, top left and bottom right.
6. Tighten bolts #5 until flush against back of dryer. Tighten lock
nut #4 to secure bolt #5 in position.
7. Tighten bolts #2 and #3.
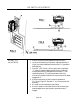
8. Remove pin “A” and check for proper clearance at points “A”
and “B”. If clearance is incorrect, repeat the above steps.
NOTE
Use short sections of round steel rod for pins or drill bits may
be used in place of round rod.
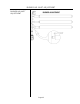
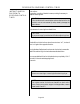
INSTRUCTIONS FOR
ALIGNING BASKETS ON
110 LB. DRYERS
BASKET ALIGNMENT FOR DRYERS WITH TM200 GEAR REDUCER