
Specifications


Page 28
S6162-BS-MMC-010/12489
REMOVAL AND INSTALLATION OF GEAR REDUCER SEALS
NOTE: On original equipment, the Cissell Gear Reducer is equipped with a Garlock Shaft Seal. If this seal
requires replacement, it cannot be replaced with the same type of seal since the original seal would have seated
in on the shaft. It must be replaced with a TU2166.
CAUTION
Drain oil before removing seals; replace with NEW oil after installing
new seals (See Cissell Gear Reducer Sheet).
Remove Gear Reducer from rear of dryer before removing seals.
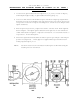
TO REMOVE EXISTING FRONT AND REAR SEALS from front
and rear caps on Gear Reducer (Fig. 1):
Slip end of screwdriver under seal (front seal illustrated); using end of
Gear Shaft as a fulcrum, force seal out. Repeat operation at several
different places until seals are removed from gear shaft.
TO REMOVE EXISTING END SEAL and END CAP
from Gear Reducer (Fig. 1):
Remove four cap screws and slip end cap and seal from worm gear. Tap
seal out of cap from inside.
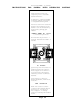
Clean inside of front, rear, and end caps. Spread permatex evenly over
area to receive seal. Clean outside end of large and small gear shafts.
Spread vasoline evenly over area to receive seal, (Fig. 2).
Spread permatex evenly over outside rim area, (Fig. 3) of seal. Spread
vasoline evenly over inside rim area of seal.
TO INSTALL NEW FRONT AND REAR SEALS:
Hold front (and rear) seal tightly in place over gear shaft with rubber seal
in. Run edge of thin, dull instrument (such as wooden spatula, illustrated
against front seal, Fig. 4) carefully around rubber wiping edge of seal and
chamfer end of gear shaft so that seal is evenly installed all around gear
shaft. DO NOT INJURE RUBBER
WIPING EDGE.
TO INSTALL NEW END SEAL:
Slip seal in end cap. Hold cap and seal tightly in place over small shaft
with rubber seal in. Run edge of wooden spatula carefully around rubber
wiping edge of end seal and chamfer end of small shaft so that seal is
evenly installed all around edge of shaft. DO NOT INJURE RUBBER
WIPING EDGE.
AFTER SEALS ARE EVENLY INSTALLED ALL AROUND
EDGES OF SHAFTS:
Place block of wood over front and rear seals and tap all around with a
plastic faced mallet, (Fig. 5) until seal is flush into recess of front (or rear)
cap.
Slip end seal and cap into position and tighten four bolts; then with a
block of wood over end seal, gently tap with plastic faced mallet, until
seal is flush into recess of end cap.
REINSTALL GEAR REDUCER ON REAR OF DRYER
IMPORTANT
While the sealing element or packing ring in a seal is not fragile, care must be taken to prevent damage to the wiping edge during
mounting. Do not apply pressure to, nor hammer directly on, the sealing ring or spring: make sure that all mounting tools
contact only the metal case of the seal.