
Specifications


Page 14
S6162-BS-MMC-010/12489
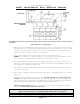
BREAK DOWN PROCEDURE (Continued)
9. Go to the rear of dryer and unscrew fourteen 3/8” nuts holding rear channel,
motor and gear reducer assembly (12) to the dryer.
10. You can remove either the right section (13) or left section (14) next. Going
to front of dryer, unscrew sixteen 1/4” hex head bolts holding either section to
the base. The bolts are located behind the sweep sheets and both in front
and rear of the compartment.
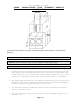
11. Unbolt the bottom section (15) from deck (six 5/8” bolts) or skid (1/4” lag
bolts), whichever it may be.
12. If the Basket (9) must be taken apart to go through the passage ways, first
turn basket on end so shaft is pointing skyward. Notice the markings on
Basket rear and spider I & II, in red. These have to be re-attached at their
same location when you re-assemble including any shims that may be
present under each spider arm (this will keep the basket balanced). Remove
4 nuts from through bolts holding spider (16) to basket (9). Count shims
under each spider arm and retain. Turn basket on its side and drill out 27
rivets on front and 27 rivets on the rear of the basket with the drill bit
provided in kit. These rivets are completely around the circumference of the
basket. Leave the ribs attached. Additional stainless steel and rivet gun are
supplied with the dryer kit. Push both ends out of the basket material and
save the ends. Now gently push sides of basket material in an oblong shape
to pass through your door opening, do not crimp basket material.
To assemble, just proceed in the reverse order.
NOTE: After rewiring fan motor, check fan rotation. See label on fan motor housing
for correct direction. To change rotation, reverse two of the three motor
wires.