Contents 1 General safety instructions ........................................................................... 3 2 Technical data and dimensions .................................................................... 4 Technical data ............................................................................................. 4 Dimensions .................................................................................................. 3 Installation and connection ...................................
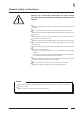
1 General safety instructions Ignoring any of the safety instructions can cause serious personal injury and can also cause damage to the linen or the machine p Read the installation and instruction manual carefully before connecting the machine. p It is recommended that the machine be installed by qualified technicians. p The machine should be installed according to the installation instructions.
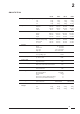
2 Technical data and dimensions Technical data HW55 HW55 Capacity (dry weight) Cylinder Cabinet Front loading Speed G-force Motor (3-phase) Drain valve Water supply Heating Packing dimensions Weight 1/11 1/10 1/9 5 kg 5,5 kg 6,1 kg Diameter Depth Volume Height Width Depth 530 mm 250 mm 55 lit. 1005 mm 660 mm 708 mm Diameter door opening Door height To center Wash Distribution Spin 300 mm 355 mm 505 mm 10 - 50 tr/min 85 tr/min 500 - 1250 tr/min Low spin/High spin 74/462 4p. 1470 tr.
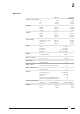
2 HW64/72/75/94 Capacity (dry weight) Cylinder Cabinet Front loading Speed G-force Motor (3-phase) Drain valve Water supply Steam connection Heating Packing dimensions Weight 1/11 1/10 1/9 Diameter Depth Volume Height Width Depth Diameter door opening Door height To center HW 64 HW72 HW 75 HW94 5,9 kg 6,5 kg 7,2 kg 6,6 kg 7,3 kg 8,1 kg 6,9 kg 7,6 kg 8,4 kg 8,6 kg 9,5 kg 10,5 kg 530 mm 295 mm 65 Lit. 530 mm 345 mm 73 Lit. 530 mm 345 mm 76 Lit. 530 mm 440 mm 95 lit.
2 HW131/164 Capacity (dry weight) Cylinder Cabinet Front loading Speed G-force Motor (3-phase) Drain valve Water supply Steam connection Heating Packing dimensions Weight 1/11 1/10 1/9 Diameter Depth Volume Height Width Depth Diameter door opening Door height To center HW 131 HW 164 12 kg 13,2 kg 14,5 kg 15 kg 16,5 kg 18,3 kg 650 mm 400 mm 132 Lit. 650 mm 400 mm 165 Lit.
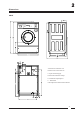
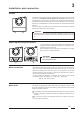
2 Dimensions HW55 A. Hard water connection 3/4" B. Warm water connection 3/4" C. Input electrical supply D. Electrical connection clamps E. Ventilation soap dispenser F. Water drain G.
2 HW64/72/75/94 p p p p p p p p p A. Hard water connection 3/4" B. Warm water connection 3/4" C. Soft water connection 3/4" D. Output connection steam valve E. Input electrical supply F. Electrical connection clamps G. Water drain H. Steam connection I.
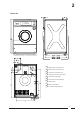
2 HW131/164 p A. Hard water connection 3/4" p B. Warm water connection 3/4" p C. Soft water connection 3/4" p D. Output connection steam valve p E. Input electrical supply p F. Electrical connection clamps p G. Water drain p H. Steam connection p I.
3 Installation and connection Ground The machine must be placed on a flat, solid surface (metal base, concrete or solid ground). It is recommended that the machine be anchored (bolts M10) on the provided places (A) in the base, especially in case of a plint (see Dimensions 2). The machine must be placed entirely level. For easy maintenance it is recommended to keep a minimal distance of 600 mm between the wall and the back of the machine.
3 Electrical Connection p Remove the cover plate at the back of the machine. (See dimensions (E)). p Connect the power cable to the connectors. Machine without electric heating Connect 230 V single phase (1AC) to the connectors N and L1. The green/yellow grounding clamp has to be connected to the grounding wire PE. Machine with electric heating 230V 1AC 230V 1 phase (1AC) should be connected to the connectors L1-N. The green/yellow grounding clamp has to be connected to the grounding wire PE.
3 Liquid soap connection (option) Connection of the liquid soap hoses A rubber connection has been placed over the air break opening at the back of the machine. There are 5 holes in this rubber connection, through each of which a liquid soap hose can be driven (S1...S5). Press the hoses until they appear well inside the soap dispenser. The central gap in the rubber connection remains and serves as air breaker.
3 Connection of a central operating panel for coinmachines (option) At the backside above the main connectors, you find a printboard, to which the central operating panel for coinmachines can be connected. The right connectors form a potential free output contact as a result of which the operating panel detects when the machine is activated or not. The left connectors receive the signal, by means of which a machine is chosen through the operating panel.
3 Steam connection Machines with steam heating must have a steam valve between the steam installation and the machine. With direct steam injection into the machine 1. 2. 3. 4. 5. 6. 7. Steam pipe Steam cut-off valve 3/8" Pipe coupling 3/8" Steam filter 3/8" Magnetic steam valve 3/8" Curve MF 3/8" Steam hose with appropriate pipe coupling 3/8" Added parts for steam heating with heat exchanger 3. 9. 10. 11. 12.
4 Operating instructions Machine with start button Opening the door Fill the drum Push the red button on the door handle to open the door. Sort the linen according to the type and required temperature of the linen. Empty all pockets of the garments so that no garments can be damaged and no left articles can cause damage to the machine. Turn sleeves of shirts, blouses inside out.
Start the machine 4 Start the wash-cycle by pressing the Start button (S) and releasing it immediately. The door is sealed and the cycle-LED lights up. During the first 2 minutes after starting, the program number is blinking and you can change the program in case of a possibly wrong selection. To do so, select another program with the SELECT button (P). This new program will start immediately.
4 During final spin, both the left spin-LED (intermediate spin) will light up together with the right spin-LED (final spin). - Functioning of the spin-LEDs during final spin: LED drain/distribution Interm. spin blinking rapidly continuously Final spin continuously low spin continuously high spin coast tumble slowly continuously off slowly continuously rapidly coast tumble - Functioning of the spin-LEDs during gentle-final spin: LED Interm.
Description of the functions 4 Function F1 (Time stop) During the wash cycle: The wash time is stopped. The temperature, water level and wash action remain the same as programmed. During the wash cycle, this function remains active until the START button (S) is pressed again. During intermediate spin : The intermediate spin normally lasts 1 minute. By activating function F1, the machine will spin for nine minutes unless the START button (S) is pressed earlier.
4 Function F3 (reduced wash action): By selecting F3, the wash action time and pause time will be reversed; unless the wash action time was programmed to be shorter than the pause time. Example: 12 sec. action/3 sec. pause becomes: 3 sec. action/12 sec. pause 6 sec. action/9 sec. pause remains: 6 sec. action/9 sec. pause This function does not influence the cycle time - the program continues normally - and remains active until the START-button (S) is pressed.
4 End of a program At the end of a program, while the door is being released, the left display shows End; and the Start-LED is switched off. After that only the right display will continue to show the program number. This is the end of the program. Premature ending of the program By pressing the START-button (S) during the program, the Start-LED is switched off and the water is drained from the machine.
4 Remarks: Freely programmable stop-function Before starting a program it is possible to preprogram a time stop in every program segment. This function permits special additional functions like adding bleach or extra detergent to the wash bath. Programming: After selecting the program, press the ECO-button (E) and keep it depressed. Now push the START-button (S) simultaneously and release same. Only now release the ECO-button (E).
4 Linking 2 programs It is possible to run 2 programs automatically in sequence. This can be handy to perform very special functions (like waterproofing outerwear) and add these to the wash program. Programming: First select the program which will be run last. Now, press the START-button (S) and keep it depressed for at least 5 seconds. The left display now shows Add. Now select the program which will be run first.
4 Machine with coin or token operation Opening the door Fill the drum Push the red button on the door handle to open the door. Sort the linen according to the type and required temperature of the linen. Empty all pockets of the garments so that no garments can be damaged and no left articles can cause damage to the machine. Turn sleeves of shirts, blouses inside out. It is recommended to mix small and large items to enhance the drop of the linen during the wash cycle and hence improve the wash quality.
4 Indications of program sequence Display information The left display will indicate the temperature of the wash bath - in °C or °F (on machines where this function has been selected). The central display shows the remaining time to the end of the wash cycle. For programs which are being run for the first time, the machine will take a theoretical time estimate.
4 End of a program Remarks At the end of a program, while the door is being released, the left display shows End and the Start-LED is switched off. After that only the right display will continue to show the program number. This is the end of the program. Rapid advance This function allows to skip the rest or certain segments of the program. This function has to be specified during preprogramming and is mostly used by technicians and maintenance personnel.
4 Cool down This function allows to gradually lower the temperature of the wash bath to prevent creasing of the linen. During a cool down, the remaining program time on the central display will be replaced by cd. Power Failure Should the power fall out during the program, the water will be drained and the door can be opened after maximum 3 minutes. When the door remains locked, and the power comes back up within 24 hours, the program will continue from there, where it was at the time of the power failure.
4 Setting the price The price is set according to the specifications at the time of ordering the machine. If no prices were specified, some standard amounts have been preset. Every program can be priced differently. These prices can also be modified easily. Accessing the price setting mode Remove the coin box from its house. Certain machines have a press button inside the coin box house at the left upper part. Access to the price setting mode is obtained using this button.
5 After programming the price for the last program, there are still the following parameters : A : Eco - price This is the decrease in value of the price for economical wash. In other words, the amount that the customer is saving by using economic wash. B : Number of coin insertions COIN 1 (up to 60.000) This parameter is only indicated if it has been programmed as such in the programmation (COIN COUNT). C : Number of coin insertions COIN 2 (up to 60.
5 Standard programs The machine is standard equipped with 10 programs (0+9). These have been designed in cooperation with specialized detergent manufacturers to obtain the best possible wash results using the most frequently used detergents. Program 0 (starching) is mostly used in very special applications and is therefore not displayed on the front panel. 0. Starching 1 RINSE COLD 1. HOT WASH 2 BATHS 40°/90°C 2. HOT WASH 1 BATH 90°C 3. COLOUREDS 2 BATHS 40°/60° 4. COLOUREDS 1 BATH 60°C 5.
6 Technical remarks Internal connections of the electrical heating Heating 1 AC R5 3kw 3 AC s LC1D0901 Heating 4,2kw 3x1,4kw 1/2 1/2 Window R5 s LC1D0901 H LC1D0901 s LC1D0901 H LC1D0901 9kw 3x3kw s LC1D1810 H LC1D0901 12kw 3x4kw ------ ------ s LC1D0901 12kw 3x2kw 3x2kw s LC1D253 H LC1D0901 15kw 3x2kw 3x3kw s LC1D253 H LC1D1810 18kw 3x3kw 3x3kw s LC1D323 H LC1D1810 21kw 3x3kw 3x4kw ----------- ----------- H s LC1D1810 LC1D1810 24kw 3x4kw 3x4kw -----
6 Error messages When one of the following malfunctions occurs during a program, the central display will communicate the appropriate error message at the end of the cycle. E3 (Eprom) The Eprom is wrong, replace it by another. Remark : For coin op machines, it is possible that a program number appears on the right display in combination with E3. This indicates a wrong price adjustment for this program. A coin value 0 or bigger than 1000 was programmed. Example : wrong price adjustment for program 5.
6 E9 (motor protection) The thermo-magnetic protection was activated 5 times. EA (tilt) The tilt switch was activated 15 times during final spin and the final spin was therefore skipped. Eb (tilt switch) The tilt switch is blocked. Mot 2 ( rotation sensor) The speed detection is not operating properly. The speed meter is probably out of order or disconnected. Remark When a malfunction occurs during a program, the central display will communicate the appropriate error message at the end of the cycle.
7 Maintenance of the machine General maintenance Periodical maintenance p Clean the entire cabinet of the machine regularly and remove all traces of soap, etc.... p Remove all detergent residue in the soap dispenser with hot water. p p Clean the door gasket and remove all detergents and other products. p It is recommended to leave the door and the soap dispenser open after use, to ventilate the machine. p The V-belts of the motors should be retightened after two to three months when first used.