Catalyst 6500 Series Switch and Cisco 7600 Series Router Network Analysis Module Installation and Configuration Note Release 3.3(1) March 2004 Corporate Headquarters Cisco Systems, Inc. 170 West Tasman Drive San Jose, CA 95134-1706 USA http://www.cisco.
THE SPECIFICATIONS AND INFORMATION REGARDING THE PRODUCTS IN THIS MANUAL ARE SUBJECT TO CHANGE WITHOUT NOTICE. ALL STATEMENTS, INFORMATION, AND RECOMMENDATIONS IN THIS MANUAL ARE BELIEVED TO BE ACCURATE BUT ARE PRESENTED WITHOUT WARRANTY OF ANY KIND, EXPRESS OR IMPLIED. USERS MUST TAKE FULL RESPONSIBILITY FOR THEIR APPLICATION OF ANY PRODUCTS.
C ON T E N T S Preface vii Audience vii Organization viii Conventions viii Safety Overview ix Related Documentation xiv Obtaining Documentation xv Cisco.
Contents Slot Assignments 2-4 Removing a Module 2-4 Installing a Module 2-5 Verifying the Installation 2-12 Cisco IOS Software 2-12 Catalyst Operating System Software CHAPTER 3 Getting Started 2-13 3-1 Configuring the NAM 3-1 Configuring Traffic Sources for Capturing NAM Traffic 3-1 Cisco IOS Software 3-2 Using SPAN as a Traffic Source 3-2 Using a VACL as a Traffic Source 3-4 Using NetFlow Data Export as a Traffic Source 3-6 Catalyst Operating System Software 3-8 Using SPAN as a Traffic Source 3-8
Contents Resetting the NAM with Catalyst Operating System Software 4-14 Upgrading the NAM Software with Catalyst Operating System Software 4-16 Upgrading the NAM Application Software with Catalyst Operating System Software 4-17 Upgrading the NAM Maintenance Software with Catalyst Operating System Software 4-18 Configuring Mini-RMON with Catalyst Operating System Software 4-20 CHAPTER 5 Operating-System-Independent NAM Administration Adding NAM Patch Software 4-20 4-20 Additional NAM Software Administr
Contents Catalyst 6500 Series Switch and Cisco 7600 Series Router Network Analysis Module Installation and Configuration Note vi 78-16413-01
Preface Product Numbers: WS-SVC-NAM-1 WS-SVC-NAM-2 This publication describes how to install the Catalyst 6500 series switch, Catalyst 6000 series switch, or Cisco 7600 series router Network Analysis Module (NAM) running NAM software release 3.3(1) and how to configure the NAM using the command-line interface (CLI) for the operating system supporting your NAM (Cisco IOS or the Catalyst operating system). You can also use the NAM Traffic Analyzer application to configure the NAM.
Preface Organization Organization This publication is organized as follows: Chapter Title Description Chapter 1 Overview Presents an overview of the Catalyst 6500 series switch, Catalyst 6000 series switch, or Cisco 7600 series router Network Analysis Module (NAM). Chapter 2 Installing the Network Analysis Module Describes how to install the NAM. Chapter 3 Getting Started Describes how to configure the NAM.
Preface Safety Overview Notes use the following conventions: Means reader take note. Notes contain helpful suggestions or references to material not covered in the publication. Note Tips use the following conventions: Means the following information will help you solve a problem. The tips information might not be troubleshooting or even an action, but it could be useful information, similar to a Timesaver. Tip Cautions use the following conventions: Caution Means reader be careful.
Preface Safety Overview Varoitus TÄRKEITÄ TURVALLISUUSOHJEITA Tämä varoitusmerkki merkitsee vaaraa. Tilanne voi aiheuttaa ruumiillisia vammoja. Ennen kuin käsittelet laitteistoa, huomioi sähköpiirien käsittelemiseen liittyvät riskit ja tutustu onnettomuuksien yleisiin ehkäisytapoihin. Turvallisuusvaroitusten käännökset löytyvät laitteen mukana toimitettujen käännettyjen turvallisuusvaroitusten joukosta varoitusten lopussa näkyvien lausuntonumeroiden avulla.
Preface Safety Overview Aviso INSTRUÇÕES IMPORTANTES DE SEGURANÇA Este símbolo de aviso significa perigo. Você está em uma situação que poderá ser causadora de lesões corporais. Antes de iniciar a utilização de qualquer equipamento, tenha conhecimento dos perigos envolvidos no manuseio de circuitos elétricos e familiarize-se com as práticas habituais de prevenção de acidentes.
Preface Safety Overview Aviso INSTRUÇÕES IMPORTANTES DE SEGURANÇA Este símbolo de aviso significa perigo. Você se encontra em uma situação em que há risco de lesões corporais. Antes de trabalhar com qualquer equipamento, esteja ciente dos riscos que envolvem os circuitos elétricos e familiarize-se com as práticas padrão de prevenção de acidentes. Use o número da declaração fornecido ao final de cada aviso para localizar sua tradução nos avisos de segurança traduzidos que acompanham o dispositivo.
Preface Safety Overview Catalyst 6500 Series Switch and Cisco 7600 Series Router Network Analysis Module Installation and Configuration Note 78-16413-01 xiii
Preface Related Documentation Related Documentation • For additional FCC class compliance information, refer to the Catalyst 6500 Series Switch Regulatory Compliance and Safety Information publication. • For additional information about the WS-SVC-NAM1 and WS-SVC-NAM-2, refer to the following: – Catalyst 6500 Series Switch Network Analysis Module Documentation. – Release Notes for Catalyst 6500 Series Switch and Cisco 7600 Series Router Network Analysis Module Software Release 3.3.
Preface Obtaining Documentation – Catalyst 6500 Series Switch Command Reference • For detailed hardware configuration and maintenance procedures, refer to the Catalyst 6500 Series Switch Module Installation Guide. Obtaining Documentation Cisco documentation and additional literature are available on Cisco.com. Cisco also provides several ways to obtain technical assistance and other technical resources. These sections explain how to obtain technical information from Cisco Systems. Cisco.
Preface Obtaining Technical Assistance Obtaining Technical Assistance For all customers, partners, resellers, and distributors who hold valid Cisco service contracts, the Cisco Technical Assistance Center (TAC) provides 24-hour-a-day, award-winning technical support services, online and over the phone. Cisco.com features the Cisco TAC website as an online starting point for technical assistance. If you do not hold a valid Cisco service contract, please contact your reseller.
Preface Obtaining Additional Publications and Information Priority 3 (P3)—Operational performance of your network is impaired, but most business operations remain functional. You and Cisco will commit resources during normal business hours to restore service to satisfactory levels. Priority 4 (P4)—You require information or assistance with Cisco product capabilities, installation, or configuration. There is little or no effect on your business operations.
Preface Obtaining Additional Publications and Information Catalyst 6500 Series Switch and Cisco 7600 Series Router Network Analysis Module Installation and Configuration Note xviii 78-16413-01
C H A P T E R 1 Overview This chapter describes the Catalyst 6500 series switch, Catalyst 6000 series switch, or Cisco 7600 series router Network Analysis Module (NAM), how it operates, and how to manage it.
Chapter 1 Overview Before You Begin To help you get started using the NAM, refer to this roadmap: Begin to install the NAM Quick Start Guide for the Catalyst 6500 Series and Cisco 7600 Series Network Analysis Module Getting Started with the NAM Information about the NAM in this release Quick Setup instructions and basic configuration Is the Catalyst 6500 Yes series switch installed on your network? Install and configure the NAM No Release Notes for Catalyst 6500 Series Network Analysis Module Softw
Chapter 1 Overview Understanding How the NAM Works This section describes how the Catalyst 6500 series switch, Catalyst 6000 series switch, or Cisco 7600 series router Network Analysis Module (NAM) operates.
Chapter 1 Overview Understanding How the NAM Uses SPAN A switched port analyzer (SPAN) session is an association of a destination port with a set of source ports, configured with parameters that specify the monitored network traffic. You can configure multiple SPAN sessions in a switched network. The WS-SVC-NAM-1 platform provides a single destination port for SPAN sessions. The WS-SVC-NAM-2 platform provides two possible destination ports for SPAN and VACL sessions.
Chapter 1 Overview Once a VACL is configured on a VLAN, all packets (routed or bridged) entering the VLAN are checked against the VACL. Packets can either enter the VLAN through a switch port or through a router port after being routed. Unlike Cisco IOS ACLs, VACLs are not defined by direction (input or output). A VACL contains an ordered list of access control entries (ACEs). Each ACE contains a number of fields that are matched against the contents of a packet.
Chapter 1 Overview NAM Traffic Analyzer provides access to the management and monitoring features for NAM data and voice traffic through a web browser. To use NAM Traffic Analyzer, you need to do some basic configuration tasks on the NAM using the CLI. You then can start NAM Traffic Analyzer with a single command.
Chapter 1 Overview STATUS LED The STATUS LED indicates the operating states of the NAM. Table 1-3 describes the LED operation. Table 1-3 STATUS LED Description Color Description Green All diagnostic tests pass. The NAM is operational. Red A diagnostic other than an individual port test failed. Orange Indicates one of three conditions: • The NAM is running through its boot and self-test diagnostic sequence. Off • The NAM is disabled. • The NAM is in the shutdown state. The NAM power is off.
Chapter 1 Overview Specifications Table 1-4 describes the specifications for the NAM. Table 1-4 WS-SVC-NAM-1 and WS-SVC-NAM-2 Specifications Specification Description Dimensions (H x W x D) 1.2 x 14.4 x 16 in. (3.0 x 35.6 x 40.6 cm) Weight Minimum: 3 lb (1.36 kg) Maximum: 5 lb (2.
C H A P T E R 2 Installing the Network Analysis Module This chapter describes the software and hardware requirements to support the Catalyst 6500 series switch, Catalyst 6000 series switch, or Cisco 7600 series router NAM, and how to install and remove the NAM.
Chapter 2 Installing the Network Analysis Module Software Requirements Software Requirements Note Starting with maintenance image release 2.1(1), there is a single maintenance image for services modules. Refer to this URL: http://www.cisco.com/cgi-bin/tablebuild.pl/cat6000-serv-maint Table 2-1 lists the NAM software versions that are supported by the Catalyst operating system and Cisco IOS software.
Chapter 2 Installing the Network Analysis Module Required Tools Required Tools Before installing the NAM, you must install the Catalyst 6500 series switch chassis, Catalyst 6000 series switch chassis, or Cisco 7600 series router chassis, and at least one supervisor engine. For information on installing the switch chassis, refer to the chassis installation guide.
Chapter 2 Installing the Network Analysis Module Installing and Removing the NAM This section describes how to install and verify the operation of the NAM in the Catalyst 6500 series switch, Catalyst 6000 series switch, and Cisco 7600 series router and contains the following sections: • Slot Assignments, page 2-4 • Removing a Module, page 2-4 • Installing a Module, page 2-5 • Verifying the Installation, page 2-12 Slot Assignments The Catalyst 6006 and 6506 switch chassis have 6 slots, the Catalys
Chapter 2 Installing the Network Analysis Module Installing and Removing the NAM Step 3 Loosen the two captive installation screws on the supervisor engine or module. Step 4 Depending on the orientation of the slots in the chassis (horizontal or vertical), perform one of the following sets of steps: Horizontal slots a. Place your thumbs on the left and right ejector levers, and simultaneously rotate the levers outward to unseat the module from the backplane connector. b.
Chapter 2 Installing the Network Analysis Module Installing and Removing the NAM To install a supervisor engine or module in the chassis, perform these steps: Step 1 Choose a slot for the supervisor engine or module. Step 2 Verify that there is enough clearance to accommodate any interface equipment that you will connect directly to the supervisor engine or module ports. If possible, place modules between empty slots that contain only module filler plates.
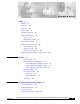
Chapter 2 Installing the Network Analysis Module Installing and Removing the NAM Figure 2-1 Positioning the Module in a Horizontal Slot Chassis Insert module between slot guides EMI gasket 3 4 5 6 4 5 6 WS-X6K-SUP2-2GE 1 ST AT US SY ST OL EM T E NS CO R M PW GM SE Switch 100% T Load CONSOLE PORT MODE RE PORT 1 PORT 2 CONSOLE SUPERVISOR2 PCMCIA EJECT 1% WS-X6K-SUP2-2GE 2 ST AT US SY ST OL EM CO T E NS R PW M GM SE Switch 100% T Load CONSOLE PORT MODE RE
Chapter 2 Installing the Network Analysis Module Installing and Removing the NAM Step 6 Depending on the orientation of the slots in the chassis (horizontal or vertical), perform one of these sets of steps: Horizontal slots a. Position the supervisor engine or module in the slot. (See Figure 2-1.) Make sure that you align the sides of the module carrier with the slot guides on each side of the slot. b.
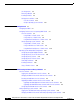
Chapter 2 Installing the Network Analysis Module Installing and Removing the NAM Figure 2-3 Ejector Lever Closure in a Horizontal Slot Chassis WS-X6K-SUP2-2GE 1 ST AT US SY ST EM CO NS O LE PW R M G M T RE SE Switch 100% T CONSOLE SUPERVISOR2 Load CONSOLE PORT MODE PORT 1 PCMCIA PORT 2 EJECT 1% WS-X6K-SUP2-2GE LI 2 ST AT US SY ST EM CO NS O LE PW R M G M NK LI NK T RE SE Switch 100% T CONSOLE SUPERVISOR2 Load CONSOLE PORT MODE PORT 1 PCMCIA PORT 2 EJEC
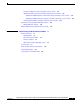
Chapter 2 Installing the Network Analysis Module Installing and Removing the NAM Figure 2-4 Positioning the Module in a Vertical Slot Chassis Ejector lever fully extended WS-C6500-SFM SWITCH FABRIC MDL FAN STATUS WS-X6K-SUP2-2GE MT OLE MG TEM NS TUS R SET RE PW SYS CO STA MT E M S OL T MG TU R NS SE STE RE PW CO SY STA WS-X6K-SUP2-2GE SUPERVISOR2 SUPERVISOR2 ST AT CONSOLE CONSOLE AC US PORT CONSOLE PORT MODE MODE WS-X6224 24 PORT 100FX CONSOLE TIV E US AT ST E TIV AC PCMCIA P
Chapter 2 Installing the Network Analysis Module Installing and Removing the NAM Figure 2-5 Clearing the EMI Gasket in a Vertical Slot Chassis Gap between the module EMI gasket and the module above it 1 mm WS-C6500-SFM SWITCH FABIRD MDL US AT ST E TIV AC FAN STATUS WS-X6K-SUP2-2GE MT E M S OL T MG TU R NS SE STE RE PW CO SY STA US AT ST MT OLE MG TEM NS TUS R SET RE PW SYS CO STA WS-X6K-SUP2-2GE SUPERVISOR2 SUPERVISOR2 WS-X6224 24 PORT 100FX CONSOLE CONSOLE E TIV AC PORT MODE PORT MOD
Chapter 2 Installing the Network Analysis Module Installing and Removing the NAM Figure 2-6 Ejector Lever Closure in a Vertical Slot Chassis FAN STATUS US SY ST CO EM T M LE G O T M EM US R NS SE ST AT RE PW SY CO ST AT NS O PW LE STA R M RE G S M TU SE T T AC CONSOLE VE CONSOLE TI CONSOLE PORT MODE CONSOLE PORT MODE PCMCIA PCMCIA EJECT EJECT 100% Switch Switch 1% 1% 100% LE PORT 1 PORT 1 SE Load Load XT WS-X6K-SUP2-2GE SUPERVISOR2 ST WS-X6K-SUP2-2GE SUPERVISOR2
Chapter 2 Installing the Network Analysis Module Installing and Removing the NAM When the NAM initially boots, by default it runs a partial memory test. To perform a full memory test, enter the hw-module module slot_number reset device:partition mem-test-full command. This command is specific to Cisco IOS software and is not available in Catalyst operating system software. A full memory test takes more time to complete than a partial memory test depending on the memory size.
Chapter 2 Installing the Network Analysis Module Installing and Removing the NAM Catalyst 6500 Series Switch and Cisco 7600 Series Router Network Analysis Module Installation and Configuration Note 2-14 78-16413-01
C H A P T E R 3 Getting Started This chapter describes how to configure the Catalyst 6500 series switch, Catalyst 6000 series switch, and Cisco 7600 series router NAM and includes these sections: • Configuring the NAM, page 3-1 • Configuring Traffic Sources for Capturing NAM Traffic, page 3-1 • Operating-System-Independent Configuration, page 3-12 Configuring the NAM How you configure the NAM on your switch depends on whether you are using Cisco IOS software or the Catalyst operating system software
Chapter 3 Getting Started Configuring Traffic Sources for Capturing NAM Traffic Table 3-1 NAM SPAN and VACL Port Configurations NAM-1 NAM-2 One SPAN session only Two SPAN sessions One VACL session only One SPAN session and one VACL session Two VACL sessions For more information about SPAN, see these URLs: http://www.cisco.com/univercd/cc/td/doc/product/lan/cat6000/122sx/swcg/span.htm http://www.cisco.com/univercd/cc/td/doc/product/lan/cat6000/sw_8_2/confg_gd/span.
Chapter 3 Getting Started Configuring Traffic Sources for Capturing NAM Traffic To enable SPAN on the NAM, perform one of these tasks: Command Purpose Router (config)# monitor session {session_number} {source {interface type slot/port} | {vlan vlan_ID}} [, | - | rx | tx | both] Sets the source interfaces and VLANs for the monitor session. Router (config)# monitor session {session_number} {destination analysis module NAM module number data-port port} Enables port 1 of the NAM as a SPAN destination.
Chapter 3 Getting Started Configuring Traffic Sources for Capturing NAM Traffic Router# 00:21:10:%SYS-5-CONFIG_I:Configured from console by console Router# conf t Enter configuration commands, one per line. End with CNTL/Z.
Chapter 3 Getting Started Configuring Traffic Sources for Capturing NAM Traffic This example shows how to configure a VACL on an ATM WAN interface and forward both ingress and egress traffic to the NAM: Cat6500# configure terminal Enter configuration commands, one per line. End with CNTL/Z.
Chapter 3 Getting Started Configuring Traffic Sources for Capturing NAM Traffic Using NetFlow Data Export as a Traffic Source NDE makes traffic statistics available for analysis by an external data collector. You can use NDE to monitor all Layer 3-switched and all routed IP unicast traffic. To use NDE as a traffic source for the NAM, enable the NetFlow Monitor option to allow the NAM to receive the NDE stream. The statistics are presented on reserved ifIndex.3000.
Chapter 3 Getting Started Configuring Traffic Sources for Capturing NAM Traffic Step 2 Select the version of NDE. Router(config)# mls nde sender version version-number Note Step 3 NAM supports NDE version 1, 5, 6, 7, 8, and version 8 aggregation caches. Refer to the Cisco IOS documentation for NDE versions that are supported by the switch software to determine which NDE versions are available to the NAM. Select the NDE flow mask.
Chapter 3 Getting Started Configuring Traffic Sources for Capturing NAM Traffic If the NetFlow device supports NDE version 8 aggregations, flows from one or more of the version 8 aggregation caches may be exported to the NAM. To export flows from the aggregation caches, perform these steps: Step 1 Select an NDE version 8 aggregation.
Chapter 3 Getting Started Configuring Traffic Sources for Capturing NAM Traffic Note If you are using the switch CLI to configure SPAN as a traffic source to NAM-1, set the destination port to 3. If you are configuring SPAN as a traffic source to NAM-2, set the SPAN Port to destination port 7. Destination port 8 is not available in this NAM release although switch and hardware support is available. Note You cannot use NAM ports as SPAN source ports.
Chapter 3 Getting Started Configuring Traffic Sources for Capturing NAM Traffic Using NetFlow Data Export as a Traffic Source To use NetFlow Data Export (NDE) as a traffic source for the NAM, you must enable the NetFlow Monitor option to allow the NAM to receive the NDE stream. For a local switch, the statistics are presented on reserved ifIndex.3000 as in previous NAM releases. The remote switch uses ifIndex.50000 and greater.
Chapter 3 Getting Started Configuring Traffic Sources for Capturing NAM Traffic Task Step 5 (Optional) Make sure that the device exports set mls nde destination-ifindex enable set mls nde source-ifindex enable if-index. Note Step 6 Command Use this step if you want to break out NetFlow data by interface and direction at the NAM. Verify NDE export.
Chapter 3 Getting Started Operating-System-Independent Configuration Operating-System-Independent Configuration These sections describe the NAM configurations that are not dependent on the switch operating system. Configuring Automatic RMON Collections RMON collections can be configured explicitly through SNMP by a management station on some data sources.
Chapter 3 Getting Started Operating-System-Independent Configuration • Enable the vlanStats collection type by entering this command from the root account of the NAM: root@localhost# autostart vlanstats enable • Disable the vlanStats collection type by entering this command from the root account of the NAM: root@localhost# autostart vlanstats disable After enabling or disabling one or more collection types, you must reboot the NAM before the configuration takes effect.
Chapter 3 Getting Started Operating-System-Independent Configuration Step 2 Enable the HTTP server as follows: root@localhost# ip http server enable Enabling HTTP server... No web users configured! Please enter a web administrator username [admin]:admin New password: Confirm password User admin added. Successfully enabled HTTP server.
Chapter 3 Getting Started Operating-System-Independent Configuration The port number range is from 1 to 65535. Note Step 4 Web users are different from the CLI users. Enable the HTTPS server as follows: root@localhost# ip http secure server enable Enabling HTTP server... No web users configured! Please enter a web administrator username [admin]:admin New password: Confirm password User admin added. Successfully enabled HTTP server.
Chapter 3 Getting Started Operating-System-Independent Configuration byhUzvi5R8UFGSmerbbnc7qkTDXQdrQ2vETAfxK4oysq+HF55qVjY2KpAgMBAAGj gfQwgfEwHQYDVR0OBBYEFEjcj4+vFJmLAo1NjnO9MYE/Hn9eMIHBBgNVHSMEgbkw gbaAFEjcj4+vFJmLAo1NjnO9MYE/Hn9eoYGapIGXMIGUMQswCQYDVQQGEwJVUzEL MAkGA1UECBMCQ0ExETAPBgNVBAcTCFNhbiBKb3NlMRwwGgYDVQQKExNDaXNjbyBT eXN0ZW1zLCBJbmMuMQwwCgYDVQQLEwNOQU0xGzAZBgNVBAMTEnIyZDItMTg2LmNp c2NvLmNvbTEcMBoGCSqGSIb3DQEJARYNbmFtQGNpc2NvLmNvbYIBADAMBgNVHRME BTADAQH/MA0GCSqGSIb3DQEBBAUAA4GBAHwBnz9OALHWkyK4qY
Chapter 3 Getting Started Operating-System-Independent Configuration gYEAVAX89pCAcRDOqPgaBEMQCmWD+wqZPnALovr7C81OLBYTgLLqdwPqoSjSYosE w/pFnIxWN1sJ7MC8+hjnJJLjoCwbyrEyvoiAvzpsGsnAZgWUVaUpR7jlNbf8x2A1 hAOH9KchS0TpSNy13OyhuAkv0pUcM2AJqB/93u4YvuHfNOA= -----END CERTIFICATE REQUEST----- Step 2 Install a certificate obtained from a certification authority as follows: root@localhost# ip http secure install certificate The HTTP server is enabled now. You must restart the server to install certificate.
Chapter 3 Getting Started Operating-System-Independent Configuration Step 4 Choose TACACS+. Step 5 Click the Enable TACACS+ Administration and Authentication box. Step 6 Follow the instructions in the online help.
C H A P T E R 4 Administering the Network Analysis Module How you administer the NAM on your Catalyst 6500 series switch, Catalyst 6000 series switch, or Cisco 7600 series router depends on whether you are using the Cisco IOS software or the Catalyst operating system software. Several NAM administration tasks are common to either operating system.
Chapter 4 Administering the Network Analysis Module Cisco IOS Software Table 4-1 shows the user levels and passwords for the NAM. Table 4-1 NAM Users and Passwords Module Application Image (located on the hard disk) Maintenance Image (located on the compact flash) WS-SVC-NAM-1 WS-SVC-NAM-2 User Password User Password root root root cisco guest guest guest cisco Note The guest account in the NAM maintenance image has all read and all write privileges.
Chapter 4 Administering the Network Analysis Module Cisco IOS Software Changing the NAM CLI Passwords with Cisco IOS Software If you have not changed the password from the factory-set default, a warning message displays when you log in to the NAM. You can use the web application on the local database. If the administrator is unknown, you can use the CLI to remove the local web users from the web user database with the rmwebusers command.
Chapter 4 Administering the Network Analysis Module Cisco IOS Software Resetting the NAM with Cisco IOS Software If you cannot reach the NAM through the CLI or an external Telnet session, enter the hw-module module module_number reset command to reset and reboot the NAM. The reset process requires several minutes. When the NAM initially boots, by default it runs a partial memory test.
Chapter 4 Administering the Network Analysis Module Cisco IOS Software Note When specifying the boot device for the WS-X3860-NAM, you must use hdd:1 for the application image or hdd:2 for the maintenance image. When specifying the boot device for the WS-SVC-NAM-1 and the WS-SVC-NAM-2, you must use hdd:1 for the application image and cf:1 for the maintenance image. Upgrading the NAM Software with Cisco IOS Software You can upgrade both the application software and the maintenance software.
Chapter 4 Administering the Network Analysis Module Cisco IOS Software Step 4 After the NAM is back online, establish a console session with the NAM and log in to the root account. Router# session slot 9 proc 1 The default escape character is Ctrl-^, then x. You can also type 'exit' at the remote prompt to end the session Trying 127.0.0.91 ... Open Cisco Network Analysis Module (WS-SVC-NAM-1) Maintenance Partition login:root Password: Network Analysis Module (WS-SVC-NAM-1) Console, 1.
Chapter 4 Administering the Network Analysis Module Cisco IOS Software This example shows how to upgrade the NAM application software: Router# hw-module module 9 reset cf:1 Device BOOT variable for reset = cf:1 Warning:Device list is not verified. Proceed with reload of module? [confirm] % reset issued for module 9 Router# 00:16:06:%SNMP-5-MODULETRAP:Module 9 [Down] Trap 00:16:06:SP:The PC in slot 9 is shutting down. Please wait ...
Chapter 4 Administering the Network Analysis Module Cisco IOS Software SendShutDownMsg - proc_id (1):shut down PC success. Module 4 shut down in progress, please don't remove module until shutdown completed. Console> (enable) 2004 May 07 23:19:03 %SYS-5-MOD_OK:Module 4 is online Upgrading the NAM Maintenance Software with Cisco IOS Software To upgrade the NAM maintenance software, follow these steps: Step 1 Copy the NAM maintenance software image to a directory accessible to FTP.
Chapter 4 Administering the Network Analysis Module Cisco IOS Software 00:16:06:SP:The PC in slot 9 is shutting down. Please wait ... 00:16:21:SP:PC shutdown completed for module 9 00:16:21:%C6KPWR-SP-4-DISABLED:power to module in slot 9 set off (admin request) 00:16:24:SP:Resetting module 9 ...
Chapter 4 Administering the Network Analysis Module Cisco IOS Software Downloading image... ftp://host/pub/rmon/mp.1-1-0-1.bin.gz (11065K) [########################] 11331153 bytes transferred in 13.21 sec (837.64k/sec) 11065K | 837.65K/s Uncompressing the image... Verifying the image... Applying the Maintenance image. This may take several minutes... Upgrade of Maintenance image completed successfully. root@hostname.cisco.
Chapter 4 Administering the Network Analysis Module Catalyst Operating System Software Catalyst Operating System Software You can perform these administrative tasks on the NAM using the Catalyst operating system software: • Logging In to the NAM with Catalyst Operating System Software, page 4-12 • Changing the NAM CLI Passwords with Catalyst Operating System Software, page 4-13 • Resetting the NAM with Catalyst Operating System Software, page 4-14 • Upgrading the NAM Software with Catalyst Operatin
Chapter 4 Administering the Network Analysis Module Catalyst Operating System Software Logging In to the NAM with Catalyst Operating System Software There are two levels of access on the NAM, each with different privileges: • Guest—Read-only CLI access (default password is guest) • Root—Full read-write access (default password is cisco) Note The root account uses the # prompt; the guest account uses the > prompt. The default root and guest passwords for the maintenance image is cisco.
Chapter 4 Administering the Network Analysis Module Catalyst Operating System Software Step 4 At the password prompt, enter the password for the account. The default password for the root account is root, and the default password for the guest account is guest. Password: After a successful login, the command-line prompt appears as follows: Network Analysis Module (WS-SVC-NAM-1) Console, Copyright (c) 2004 by Cisco Systems, Inc. WARNING! Default password has not been changed! 3.3(0.
Chapter 4 Administering the Network Analysis Module Catalyst Operating System Software Note New passwords must be at least six characters in length and may include uppercase and lowercase letters, numbers, and punctuation marks. To change a password, follow these steps while logged into the NAM as root: Step 1 Enter this command as follows: root@localhost# password username Note In NAM software release 2.2, the username argument is required.
Chapter 4 Administering the Network Analysis Module Catalyst Operating System Software To enable a full memory test, use the set boot device bootseq mod# mem-test-full command. This example shows how to do a full memory test: Console (enable) set boot device cf:1 4 mem-test-full Device BOOT variable = cf:1 Memory-test set to FULL Warning:Device list is not verified but still set in the boot string.
Chapter 4 Administering the Network Analysis Module Catalyst Operating System Software This example shows how to reset the module to the maintenance image from the enable mode: Console> (enable) reset cf:1 This example shows how to reset the module to the NAM application image from the enable mode: Console> (enable) reset This example shows how to reset the NAM that is installed in slot 4 from the CLI: Console> (enable) reset 4 This command will reset module 4.
Chapter 4 Administering the Network Analysis Module Catalyst Operating System Software Upgrading the NAM Application Software with Catalyst Operating System Software To upgrade the NAM application software, follow these steps: Step 1 Copy the NAM application software image to a directory accessible to FTP. Step 2 Log into the switch through the console port or through a Telnet session. Step 3 If the NAM is already running in the maintenance image, go to Step 4.
Chapter 4 Administering the Network Analysis Module Catalyst Operating System Software Trying 127.0.0.31 ... Open Cisco Maintenance image login: root Password: Maintenance image version: 2.1(0.7) root@namlab-kom2.cisco.com# upgrade ftp://namlab-pc1/pub/rmon/nam-app.3-3-0-15.bin.gz Downloading the image. This may take several minutes... ftp://namlab-pc1/pub/rmon/nam-app.3-3-0-15.bin.gz (58699K) /tmp/upgrade.gz [########################] 58699K | 6499.18K/ss 60108348 bytes transferred in 9.03 sec (6499.
Chapter 4 Administering the Network Analysis Module Catalyst Operating System Software where ftp-url is the FTP location and the name of the NAM software image file. Note If the FTP server does not allow anonymous users, use the following syntax for the ftp-url value: ftp://user@host/absolute-path/filename. Enter your password when prompted. Step 6 Follow the screen prompts during the upgrade. Step 7 After completing the upgrade, log out of the NAM.
Chapter 4 Administering the Network Analysis Module Operating-System-Independent NAM Administration Applying the Maintenance image. This may take several minutes... Upgrade of Maintenance image completed successfully. Configuring Mini-RMON with Catalyst Operating System Software With Catalyst operating system software, you can enable mini-RMON.
Chapter 4 Administering the Network Analysis Module Additional NAM Software Administrative Commands Note If HTTP or the HTTP server are running, and you are running the NAM Traffic Analyzer web application, click on the About link in the GUI to display a list of installed patches. If nothing appears, no patches were installed. This Catalyst operating system software example shows how to apply patch software: Console> (enable) reset 3 This command will reset module 3.
Chapter 4 Administering the Network Analysis Module Additional NAM Software Administrative Commands Catalyst 6500 Series Switch and Cisco 7600 Series Router Network Analysis Module Installation and Configuration Note 4-22 78-16413-01
C H A P T E R 5 Troubleshooting the Network Analysis Module This chapter describes how to troubleshoot the NAM and includes these sections: Note • Netflow Data Export, page 5-1 • Error Messages, page 5-8 • Web Username and Password Guidelines, page 5-14 • Supported MIB Objects, page 5-15 • Local Interfaces in the NAM ifTable, page 5-19 Additional troubleshooting help is available to the NAM Traffic Analyzer application users in the online help “Troubleshooting” section.
Chapter 5 Troubleshooting the Network Analysis Module Netflow Data Export Catalyst Operating System: For the PFC, use the following commands to specify the aging time: Router(enable) set mls agingtime [long-duration | fast | ip] To set the aging time for flows that are long active, use the long-duration keyword. To set the aging time for flows that do not exceed the packet threshold, use the fast keyword. To set the aging time for IP flows, use the ip keyword.
Chapter 5 Troubleshooting the Network Analysis Module Netflow Data Export To verify that a NetFlow device is configured to send NetFlow packets to UDP port 3000 of the NAM, use the following commands: Router# show ip flow export or Router# show mls nde Displayed information should show whether or not NetFlow export is enabled or disabled and show the IP address and port to which the NetFlow packets are being exported.
Chapter 5 Troubleshooting the Network Analysis Module Netflow Data Export Explanation When creating a NetFlow data source from the Setup > Data Sources > NetFlow > Custom Data Sources screen, only the local device’s address appears in the drop down box. Recommended Action A device is created in the Setup > Data Sources > NetFlow > Devices screen.
Chapter 5 Troubleshooting the Network Analysis Module Netflow Data Export Figure 5-1 NDE Configuration Host A Host B Host C a 91719 b c Router The configuration is as follows: Router# configuration terminal Router(config)# interface a Router(config-if)# ip route cache flow Router(config-if)# exit Router(config)# ip flow export destination NAM-Address 3000 Router config)# exit Router# Table 5-1 Reporting Flow Records Input Interface Output Interface Are Flows Reported? a b Yes a c Yes b
Chapter 5 Troubleshooting the Network Analysis Module Netflow Data Export Router(config)# interface b Router(config-if)# ip route cache flow Router(config-if)# exit Router(config)# ip flow export destination NAM-Address 3000 Router(config)# exit Router# Table 5-2 Reporting Flow Records From To Are Flows Reported? a b Yes a c Yes b c Yes b a Yes c a No c b No Recommended Action In most cases, turning on NetFlow on an interface will populate the NetFlow cache in a switch or router
Chapter 5 Troubleshooting the Network Analysis Module Netflow Data Export Table 5-3 Effects on Data Collection Screens Flow Effect Full flow-mask is supported Highly recommended. Refer to the NDE usage guidelines for the device to apply full flow masks.
Chapter 5 Troubleshooting the Network Analysis Module Error Messages Table 5-3 Effects on Data Collection Screens (continued) Flow Effect NDE version 8-Prefix-Aggregation NDE version 8-Source-Prefix-Aggregation NDE version 8-AS-Aggregation • Monitor > Apps displays “Others” only. • Monitor > Host displays data as subnets (as well as 0.0.0.0). The detail popup window displays no data. • Monitor > Conversation displays data (as well as 0.0.0.0 to 0.0.0.0). Detail popup window displays no data.
Chapter 5 Troubleshooting the Network Analysis Module Error Messages Symptom You receive a verification failed message when installing a patch on the NAM. Possible Cause The cause could be that the time and date on the NAM are not correct, the patch is not the same as an official Cisco patch, the patch might be from a previous release of the NAM, the FTP process may have failed, or the FTP image being pointed to is not a patch (it may be a full application image).
Chapter 5 Troubleshooting the Network Analysis Module Error Messages Possible Cause This image is not supported on the specified NAM. Two NAM 3.3 images are available: One each for the WS-SVC-NAM-1 and WS-SVC-NAM-2. This symptom occurs only if an incompatible image is used. Recommended Action The application and maintenance file image formats are different between the previous NAM releases and the newer WS-SVC-NAM-1 and WS-SVC-NAM-2.
Chapter 5 Troubleshooting the Network Analysis Module Error Messages Console> (enable) show boot device 4 Device BOOT variable = cf:1 Memory-test set to FULL This example shows how to reset the partial memory test: Console> (enable) set boot device cf:1 4 Device BOOT variable = cf:1 Memory-test set to PARTIAL Warning:Device list is not verified but still set in the boot string.
Chapter 5 Troubleshooting the Network Analysis Module Error Messages Symptom You cannot connect to the NAM. Possible Cause The initial configuration is incorrect or not configured. Recommended Action Reconfigure the NAM as described in the “Configuring the NAM” section on page 3-1. Symptom You cannot connect to the NAM Traffic Analyzer application. Possible Cause The configuration for the HTTP server is not correct.
Chapter 5 Troubleshooting the Network Analysis Module Error Messages Step 4 Look for the following messages near the end of the log and take the recommended actions: ...PAM-tacplus[612]:auth failed:Login incorrect Possible Cause The name and password do not match the login configuration in the TACACS+ server. Recommended Action Log in to the TACACS+ server and configure the authentication and authorization for the NAM user. (See the TACACS+ documentation for information on login configuration.) ...
Chapter 5 Troubleshooting the Network Analysis Module Web Username and Password Guidelines Possible Cause The image that you are trying to upgrade is not a valid maintenance image or is not compatible with this release. Recommended Action You need to use the correct maintenance image for the NAM-1 or the NAM-2. Do not use the WS-X6380-NAM maintenance image. Symptom When upgrading from a WS-X6380-NAM application image, this message displays: Incompatible image! Upgrade aborted.
Chapter 5 Troubleshooting the Network Analysis Module Supported MIB Objects Step 1 Access the NAM CLI. Step 2 Enter these commands: web-user user name name exit Step 3 At the prompt, enter the new password. Step 4 Enter Y to confirm the new password. When the NAM TACACS+ setting is misconfigured and a local database user account is not available to fix this problem from the web interface, you may be able to fix the TACACS+ configuration by using the CLI interface.
Chapter 5 Troubleshooting the Network Analysis Module Supported MIB Objects Table 5-4 Supervisor Engine Module and NAM RMON Support Module Object Identifier (OID) and Description Source Supervisor Engine ...mib-2(1).rmon(16).statistics(1).etherStatsTable(1)...mib-2(1).rm on(16).statistics(1).tokenRingMLStatsTable(2) ...mib-2(1).rmon(16).statistics(1).
Chapter 5 Troubleshooting the Network Analysis Module Supported MIB Objects Table 5-4 Supervisor Engine Module and NAM RMON Support (continued) Module Object Identifier (OID) and Description Source Network Analysis ...mib-2(1).rmon(16).event(9) RFC 2819 (RMON-MIB) Supervisor Engine ...mib-2(1).rmon(16).tokenRing(10).ringStationControlTable(1) ...mib-2(1).rmon(16).tokenRing(10).ringStationTable(2) ...mib-2(1).rmon(16).tokenRing(10).ringStationOrderTable(3) ...mib-2(1).rmon(16).tokenRing(10).
Chapter 5 Troubleshooting the Network Analysis Module Supported MIB Objects Table 5-4 Supervisor Engine Module and NAM RMON Support (continued) Module Object Identifier (OID) and Description Source Network Analysis ...mib-2(1).rmon(16).switchRMON(22).smonMIBObjects(1). RFC 2613 (SMON-MIB) smonStats(2).smonVlanStatsControlTable(1). Traffic statistics by VLAN ID number. Network Analysis ...mib-2(1).rmon(16).switchRMON(22).smonMIBObjects(1). RFC 2613 (SMON-MIB) smonStats(2).
Chapter 5 Troubleshooting the Network Analysis Module Local Interfaces in the NAM ifTable Table 5-4 Module Supervisor Engine Module and NAM RMON Support (continued) Object Identifier (OID) and Description Source rmon.dsmonMib(26).dsmonObjects(1).dsmonHostObjects(4). dsmonHostCtlTable(1) rmon.dsmonMib(26).dsmonObjects(1).dsmonHostObjects(4). dsmonHostTable(2) rmon.dsmonMib(26).dsmonObjects(1).dsmonHostObjects(4). dsmonHostTopNCtlTable(3) rmon.dsmonMib(26).dsmonObjects(1).dsmonHostObjects(4).
Chapter 5 Troubleshooting the Network Analysis Module Local Interfaces in the NAM ifTable The WS-SVC-NAM-2 appears in the supervisor engine CLI (in the Catalyst operating system) and ifTable as eight ports. Ports 1, 3, 4, 5, and 6 are unused. Port 2 is the management port (the same as on WS-SVC-NAM-1). Ports 7 and 8 are both data ports and can be SPAN targets. The supervisor engine CLI (in the Cisco IOS software) parses the ports to (“analysis module . . .”).