
User guide


Using Your WIP310
Setting Up Call Forwarding
Cisco WIP310 User Guide 53
3
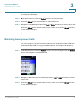
STEP 1 After navigating to
Call Forwarding
in the Settings menu, press the Select button
to see the call forwarding options.
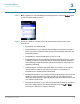
STEP 2 Scroll up or down to navigate to the call forward option that you want. Your
choices are:
• Forward All—Forward all calls.
• Forward All Dest—If you selected Forward All, enter the phone number to
which you want to forward all calls. To stop call forwarding, delete the call
forwarding number.
• Forward Busy—Forward calls when you are on a call.
• Forward Busy Dest—If you selected
Forward Busy
, enter the phone number
to which you want to forward the calls. To stop call forwarding, delete the
call forwarding number. By default, calls are forwarded to voice mail (“vm”
appears in this field).
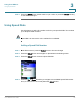
• Forward No Ans—Forward calls when there is no answer at your phone.
You can set the number of seconds for the phone to ring before it is
forwarded in the
Forward No Ans Delay
field.
• Forward No Ans Dest—If you selected
Forward No Answer
, enter the phone
number to which you want to forward the calls. To stop call forwarding,
delete the call forwarding number. By default, calls are forward to voice mail
(“vm” appears in this field).
• Forward No Ans Delay—If you selected
Forward No Answer
, the number of
seconds to elapse before the call is forwarded. Press the Left or Right
Arrow keys to select the number of seconds.