
User guide


Chapter 2
Installing the WIP310
9
Wireless-G IP Phone
Accessing the Wireless Network
The first time you power on the phone, the phone is not
configured to connect to a network. To connect your
phone to your wireless network, you need to set up a
Wireless Profile. There are two ways to configure the Wi-
Fi Profile: Automatically via Wi-Fi Protected Setup® and
Manually.
NOTE: When configuring the phone’s
wireless network, you should be as close as
possible to the wireless router. For normal
use, the phone should be within 300 feet
(90 m) of the wireless network to connect.
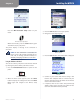
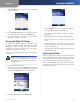
Using Wi-Fi Protected Setup
If your wireless router supports Wi-Fi Protected Setup, you
can use this option to automatically connect the phone to
your wireless network.
NOTE: Look for the Wi-Fi Protected Setup
button on your router. If you are not sure that
your router supports this feature, consult
your router User Guide.
Wi-Fi Protected Setup button
The Wi-Fi Protected Setup Mark is a mark of the Wi-Fi Alliance. †
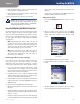
Using the Push Button Method
The easiest way to connect your phone to the wireless
network is the push button method.
Press the 1. Power/End Call button to power on the
phone.
Power/End Call button
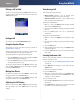
When the Home screen appears, press the 2. Select
button to display the Settings menu. Press the Select
Button again and navigate to the Wireless Setup
menu.
Settings Menu
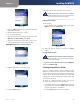
Press the 3. Select button to view your options.
To automatically configure your profile, navigate to4.
Use Wi-Fi Protected Setup and press the Select button.
Wi-Fi Protected Setup
Navigate to 5. Connect easily by pushing a button.
Connect Screen
Press the 6. Select button.
Follow the phone’s on-screen instructions to connect 7.
your phone to your network using Wi-Fi Protected
Setup: