
Troubleshooting guide


1-51
Cisco Wide Area Application Services Configuration Guide
OL-26579-01
Chapter 1 Monitoring and Troubleshooting Your WAAS Network
Configuring and Viewing Logs
To enable system logging, follow these steps:
Step 1 From the WAAS Central Manager menu, choose Devices > device-name (or Device Groups >
device-group-name).
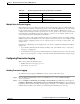
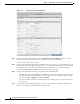
Step 2 Choose Configure > Monitoring > Log Settings > System Log. The System Log Settings window
appears. (See Figure 1-10.)
Figure 1-10 System Log Settings Window
Step 3
Under the System Log Settings section, check the Enable check box to enable system logging. By
default, this option is disabled.
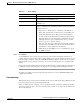
Step 4 From the Facility drop-down list, choose the appropriate facility.
Step 5 Enable system log files to be sent to the console:
a. In the Console Settings section, check the Enable check box.
b. From the Priority drop-down list, choose the severity level of the message that should be sent to the
specified remote syslog host. The default priority-code is “warning” (level 4). Each syslog host is
capable of receiving a different level of event messages.
(See Table 1-16 on page 1-52 for a list of
priority levels.)
Step 6 Enable syslog files to be sent to a disk:
a. In the Disk Settings section, check the Enable Disk Settings check box.
b. In the File Name field, enter a path and a filename where the syslog files will be stored on a disk.
c. From the Priority drop-down list, choose the severity level of the message that should be sent to the
specified remote syslog host. The default priority code is “warning” (level 4). Each syslog host is
capable of receiving a different level of event messages.
(See Table 1-16 on page 1-52 for a list of
priority levels.)