
Troubleshooting guide


1-46
Cisco Wide Area Application Services Configuration Guide
OL-26579-01
Chapter 1 Monitoring and Troubleshooting Your WAAS Network
Managing Reports
Scheduling Reports
You can schedule reports to be generated once or periodically such as daily, weekly, or monthly. When
a scheduled report is generated, a copy of the report can be e-mailed.
To schedule a report, follow these steps:
Step 1 From the WAAS Central Manager menu, choose Monitor > Reports > Reports Central.
Step 2 Check the box next to the report that you want to schedule.
If you do not see the report that you are looking for, you may need to scroll the Reports table.
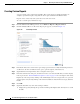
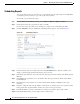
Step 3 Click the Schedule icon in the taskbar. The scheduling window appears, as shown in Figure 1-9.
Figure 1-9 Scheduling a Report
Step 4
In the Date field, enter the schedule date in the format DD/MM/YYYY or click the calendar icon to
display a calendar popup window from which to choose the date.
Step 5 In the Hours drop-down list, choose the hours. The time represents the local time at the WAAS Central
Manager.
Step 6 In the Minutes drop-down list, choose the minutes. The time represents the local time at the WAAS
Central Manager.
Step 7 In the Frequency drop-down list, choose Once, Hourly, Daily, Weekly, or Monthly for the report
frequency.
Step 8 In the No. of Reports field, enter the number of times that a reoccurring report is to be generated. After
being generated the specified number of times, the report is no longer generated.
Step 9 In the Email Id field, enter the e-mail addresses of the report recipients, separated by commas.
Step 10 In the Email Subject field, enter the subject of the e-mail message.