
Troubleshooting guide


1-9
Cisco Wide Area Application Services Configuration Guide
OL-26579-01
Chapter 1 Configuring Virtual Blades
Enabling and Disabling Virtual Blades
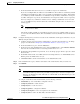
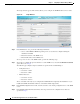
Step 2 Choose Admin > Virtualization > Actions. The Virtual Blade Actions window appears (see
Figure 1-3).
Figure 1-3 Virtual Blade Actions Window
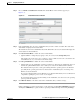
Step 3
In the Virtual Blade list, choose the virtual blade that you want to enable or disable. The status of the
virtual blade is displayed in the Status field.
The default selection for the Virtual Blade list is All. When All is selected, the Status field displays the
current status for all virtual blades.
Step 4 Click Start Virtual Blade to enable the selected virtual blade.
• (Optional) Enter a startup delay by typing a value, in seconds, in the Startup Delay field.
The startup delay can be used to give you time to connect a VNC session to the console before the
virtual blade boots, so you can observe the initial startup.
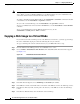
Step 5 Click Stop Virtual Blade to disable the selected virtual blade.
• (Optional) To give the virtual blade operating system time to shut down the virtual blade after you
click the Stop Virtual Blade button, enter a value (in seconds) in the Shutdown Timeout field.
The shutdown timeout provides a delay period during which the operating system can shutdown
gracefully. If the operating system has not shut down the virtual blade by the end of this period,
WAAS cancels the shutdown.
If you set the Shutdown Timeout to 0, WAAS forces a shutdown immediately. A forced shutdown is
comparable to pulling the power cord on a real computer.
To avoid losing data in open programs running on the virtual blade, it is safer to have the operating
system perform the shutdown.
Step 6 Click Refresh Status to refresh the status of the virtual blade after you make a change.
During virtual blade operation, the CD image can be changed by clicking Eject CD-ROM, followed by
clicking Use CD-ROM (for a physical CD) or specifying an ISO disk image and clicking Set Image.