
Troubleshooting guide


1-39
Cisco Wide Area Application Services Configuration Guide
OL-26579-01
Chapter 1 Configuring Application Acceleration
Enabling and Disabling the Global Optimization Features
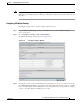
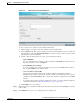
Figure 1-24 Creating New CA Certificate Window
b.
Type a name for the certificate in the Certificate Name field.
c. (Optional) Type a description of the CA certificate in the Description field.
d. Choose disabled in the Revocation check drop-down list to disable OCSP revocation of certificates
signed by this CA. Check the Ignore OCSP failures check box to mark revocation check successful
if the OCSP revocation check failed.
e. Add the certificate information by choosing on of the following methods:
–
Upload PEM File
If you are uploading a file, it must be in a Privacy Enhanced Mail (PEM) format. Browse to the
file that you want to use and click Upload.
–
Paste PEM Encoded Certificate
If you are pasting the CA certificate information, paste the text of the PEM format certificate
into the Paste PEM Encoded certificate field.
–
Get CA Certificate using SCEP
This option automatically configures the certificate authority using Simple Certificate
Enrollment Protocol. If you are using the automated certificate enrollment procedure, enter the
CA URL and click Get Certificate. The contents of the certificate is displayed in text and PEM
formats.
To complete the automated certificate enrollment procedure, you must configure the SSL auto
enrollment settings in the “SSL Auto Enrollment” section on page 1-40.
f. Click Submit to save your changes.
Step 5 (Optional) To remove a Certificate Authority from the list, select it and then click the Delete icon located
in the toolbar.
Step 6 Click Submit when you are done configuring the CA certificate list.