
Troubleshooting guide

1-15
Cisco Wide Area Application Services Configuration Guide
OL-26579-01
Chapter 1 Configuring File Services
Configuring File Services
Note If one of these limits is exceeded during a prepositioning task, the task is terminated and a
message is sent to the Administrator log. Any remaining files are exported the next time the task
is run. If a user requests one of the missing files before this happens, it is fetched over the WAN
through WAAS software as usual.
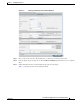
Step 6 (Optional) Check the Ignore Hidden Directories check box if you want to prevent hidden directories
on the file server from being prepositioned. This check box is unchecked by default. If you leave this
box unchecked, hidden directories are prepositioned.
Step 7 In the File Server field, enter the name of a file server to export. Do not use the double quote (") or
forward slash (/) characters.
Step 8 From the Location drop-down list, choose the device location that will provide browsing services for the
file server; normally this is the data center WAE. For the best browsing performance, specify a location
that is close to the file server. The location is used only for browsing; each edge WAE will retrieve
prepositioned files directly from the file server, not from this location. For more information on defining
locations, see the “Working with Device Locations” section on page 1-9.
Step 9 In the User name, Password, and Confirm Password fields, enter the username and password credentials
for the file server. If the username is in a Windows domain, specify the domain name as part of the User
name field, as follows: domain\username.
The access credentials that you enter must allow read access to the prepositioned root directories and to
their parent directories.
Step 10 (Optional) Check the DSCP value for high priority messages check box if you want to assign a DSCP
marking value to the prepositioning traffic. Choose a DSCP value from the drop-down list or enter a
number from 0–63 in the text field.
DSCP is a field in an IP packet that enables different levels of service to be assigned to the network
traffic. Levels of service are assigned by marking each packet on the network with a DSCP code and
associating a corresponding level of service. DSCP is the combination of IP Precedence and Type of
Service (ToS) fields. For more information, see RFC 2474.
Step 11 In the Root Share and Directories field, enter the directories on the file server that you want to export.
Use any of the following methods to identify a directory:
• Manually enter one or more directory paths in the following format: protocol://server/share or
server\share. For example, cifs://win12srv/home or win12srv\home. You may enter multiple lines
for multiple directories, with each full directory path on its own line. You cannot specify the root
directory (/) as a root share.
When you define multiple root shares, the preposition sequence that is performed for a single root
configuration is repeated for each root serially.
• Click the Browse button to browse the directories on the file server. To navigate into a directory,
click the file folder icon to the left of the directory name. Check the check box next to the directory
that you want to export and then click the Select Directory button. The browse window allows you
to choose multiple directories.
The browse function operates best when you choose in the Location drop-down list the location of
the nearest CIFS accelerator to the file server. If you do not choose a location, the browse request is
sent to all devices that have the CIFS accelerator enabled, and the request may time out.
• Check the Include Sub Directories check box to include all subdirectories under the specified root
directory. If this option is not selected, only the files in the specified root directory are prepositioned
and you cannot select subdirectories when you are browsing.