
Troubleshooting guide


1-6
Cisco Wide Area Application Services Configuration Guide
OL-26579-01
Chapter 1 Configuring Other System Settings
Configuring Date and Time Settings
Step 3 To configure a standard time zone, follow these steps:
a. Under the Time Zone Settings section, click the Standard Time Zone radio button. The default is
UTC (offset = 0) with no summer time configured. When you configure a standard time zone, the
system is automatically adjusted for the UTC offset, and the UTC offset need not be specified.
The standard convention for time zones uses a Location/Area format in which Location is a
continent or a geographic region of the world and Area is a time zone region within that location.
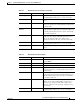
b. From the drop-down list, choose a location for the time zone. (For an explanation of the
abbreviations in this list, see Table 1-2.)
The window refreshes, displaying all area time zones for the chosen location in the second
drop-down list.
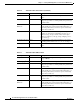
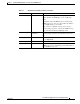
c. Choose an area for the time zone. The UTC offset is automatically set for standard time zones.
Summer time is built-in for some standard time zones (mostly time zones within the United States),
and will result an automatic change in the UTC offset during summer time. For a list of standard
time zones that can be configured and their UTC offsets, see Table 1-3.
Step 4 To configure a customized time zone on the device, follow these steps:
a. Under the Time Zone Settings section, click the Customized Time Zone radio button.
b. In the Customized Time Zone field, specify the name of the time zone. The time zone entry is
case-sensitive and can contain up to 40 characters including spaces. If you specify any of the
standard time zone names, an error message is displayed when you click Submit.
c. For UTC Offset, choose the + or – sign from the first drop-down list to specify whether the
configured time zone is ahead or behind UTC. Also, choose the number of hours (0–23) and minutes
(0–59) offset from UTC for the customized time zone. The range for the UTC offset is from –23:59
to 23:59, and the default is 0:0.
Step 5 To configure customized summer time, follow these steps under the Customized Summer Time Savings
section.
Note You can specify a customized summer time for both standard and customized time zones.
a. To configure absolute summer time, click the Absolute Dates radio button.
You can configure a start date and end date for summer time in absolute dates or recurring dates.
Absolute date settings apply only once and must be set every year. Recurring dates apply repeatedly
for many years.
b. In the Start Date and End Date fields, specify the month (January through December), day (1–31),
and year (1993–2032) on which summer time must start and end in mm/dd/yyyy format. Make sure
that the end date is always later than the start date.
Alternatively, click the Calendar icon next to the Start Date and End Date fields to display the Date
Time Picker popup window. By default the current date is highlighted in yellow. In the Date Time
Picker popup window, use the left or right arrow icons to choose the previous or following years, if
required. Choose a month from the drop-down list. Click a day of the month. The chosen date is
highlighted in blue. Click Apply. Alternatively, click Set Today to revert to the current day. The
chosen date will be displayed in the Start Date and End Date fields.
c. To configure recurring summer time, click the Recurring Dates radio button.
d. From the Start Day drop-down list, choose a day of the week (Monday-Sunday) to start.