
Troubleshooting guide


1-4
Cisco Wide Area Application Services Configuration Guide
OL-26579-01
Chapter 1 Creating and Managing IP Access Control Lists for WAAS Devices
Creating and Managing IP ACLs for WAAS Devices
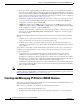
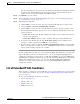
Figure 1-1 Creating a New Condition for an Extended IP ACL Window
b.
Enter values for the properties that are enabled for the type of IP ACL that you are creating, as
follows:
–
To set up conditions for a standard IP ACL, go to Step 6.
–
To set up conditions for an extended IP ACL, go to Step 7.
Step 6 Set up conditions for a standard IP ACL:
a. From the drop-down list, choose a purpose (Permit or Deny).
b. In the Source IP field, enter the source IP address.
c. In the Source IP Wildcard field, enter a source IP wildcard address.
d. Click Submit to save the condition.
The Modifying IP ACL window reappears, displaying the condition and its configured parameters
in tabular format.
e. To add another condition to the IP ACL, repeat the steps.
f. To reorder your list of conditions from the Modifying IP ACL window, use the Up or Down Arrows
in the Move column, or click a column heading to sort by any configured parameter.
Note The order of the conditions listed in the WAAS Central Manager GUI becomes the order in
which IP ACLs are applied to the device.
g. When you have finished adding conditions to the IP ACL, and you are satisfied with all your entries
and the order in which the conditions are listed, click Submit in the Modifying IP ACL window to
commit the IP ACL to the device database.
A green “Change submitted” indicator appears in the lower right corner of the Modifying IP ACL
window to indicate that the IP ACL is being submitted to the device database. Table 1-1 describes
the fields in a standard IP ACL.