
Troubleshooting guide

1-11
Cisco Wide Area Application Services Configuration Guide
OL-26579-01
Chapter 1 Configuring Network Settings
Configuring Network Interfaces
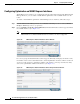
Step 4 From the Logical Interface Type drop-down list, choose PortChannel and click OK. The window
refreshes with fields for configuring the port-channel interface settings.
Step 5 From the Port Channel Number drop-down list, choose a number for the interface.
Step 6 (Optional) From the Bridge Group Number drop-down list, choose a bridge group number with which
to associate this interface, or choose None. The bridge group number can be associated with a BVI or
an inline bridge group defined on an AppNav Controller.
Step 7 (Optional) From the Standby Group Number drop-down list, choose a standby group number with which
to associate this interface, or choose None.
You must create the standby group with no assigned interfaces before it appears as a choice in this list.
Step 8 (Optional) In the Description field, optionally enter a description for the interface.
Step 9 (Optional) Check the Shutdown check box to shut down the hardware interface. By default, this option
is disabled.
If you plan to assign this port-channel interface to a standby interface, check this box.
Step 10 (Optional) From the Load Interval drop-down list, choose the interval in seconds at which to poll the
interface for statistics and calculate throughput. The default is 30 seconds.
Step 11 In the Address field, specify the IP address of the interface.
If you are assigning this port-channel interface to a standby group, do not configure an IP address or
netmask. The standby group supplies the IP address and netmask.
Step 12 In the Netmask field, specify the netmask of the interface.
Step 13 (Optional) From the Inbound ACL drop-down list, choose an IP ACL to apply to inbound packets.
The drop-down list contains all the IP ACLs that you configured in the system.
Step 14 (Optional) From the Outbound ACL drop-down list, choose an IP ACL to apply to outbound packets.
Step 15 In the Assign Interfaces area, click the check box next to the interfaces that you want to assign to this
port channel and click the Assign taskbar icon. To unassign any assigned interfaces, check each interface
that you want to unassign and click the Unassign taskbar icon.
If you plan to assign this port-channel interface to a standby interface, do not assign interfaces until after
the port channel is assigned to the standby interface.
Step 16 Click OK.
Configuring a Port-Channel Interface on a Device Earlier than Version 5.0
To configure a port-channel interface for devices with WAAS versions earlier than 5.0, follow these
steps:
Step 1 From the WAAS Central Manager menu, choose Devices > device-name.
Step 2 Choose Configure > Network > Network Interfaces. The Network Interfaces window appears, listing
all the interfaces for the chosen device.
Step 3 In the taskbar, click the Create New Interface icon. The Creating New Network Interface window
appears.
Step 4 From the Port Type drop-down list, choose PortChannel.
The window refreshes and provides fields for configuring the network interface settings.