
Troubleshooting guide

1-24
Cisco Wide Area Application Services Configuration Guide
OL-26579-01
Chapter 1 Configuring AppNav
Configuring an AppNav Cluster
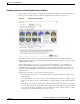
b. Click the Add Policy Rule taskbar icon.
A new row is added, showing fields for configuring the rule.
c. From the Class-Map drop-down list, choose the class map to which this rule applies.
d. From the Distribute To drop-down list, choose the distribution action to apply to the class map. The
list includes all defined WNGs and the choices (Inherit), to inherit this action from the parent policy,
and (Passthrough), to pass through this type of traffic.
e. (Optional) From the Backup drop-down list, choose the backup WNG to use for distribution if the
primary WNG is unavailable.
f. (Optional) From the Monitor drop-down list, choose the application accelerator to monitor.
g. Click OK to save the policy rule and return to the AppNav Policy Rule pane for the primary policy
rule you are creating.
Step 11 Click OK to create the policy rule and return to the policy configuration window.
Note If all AppNav policies have been deleted and you add a new policy rule, the policy rule is added to a new
appnav_default policy, which is created automatically.
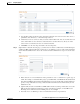
Managing AppNav Policies
To create or delete AppNav policies or configure the ANCs to which policies apply, follow these steps:
Step 1 From the WAAS Central Manager menu, choose AppNav Clusters > cluster-name.
Step 2 Choose Configure > AppNav Cluster > AppNav Policies.
The AppNav Policy window appears.
Step 3 Choose the policy to view from the AppNav Policy drop-down list at the top.
For details on using the AppNav Policy Rules area see the “Configuring Rules Within an AppNav
Policy” section on page 1-22.
Step 4 Click Manage.