
Getting Started Guide
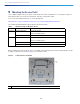

Table Of Contents
- Cisco Catalyst 9120AX Series Access Points
- 1 About this Guide
- 2 About the Access Point
- 3 Safety Instructions
- 4 Unpacking
- 5 AP Views, Ports, and Connectors
- 6 Preparing the AP for Installation
- 7 Installation Overview
- 8 Performing a Pre-Installation Configuration
- 9 Mounting the Access Point
- 10 Powering the Access Point
- 11 Configuring and Deploying the Access Point
- 12 Checking the Access Point LEDs
- 13 Miscellaneous Usage and Configuration Guidelines
- 14 FAQs
- 15 Related Documentation
- 16 Declarations of Conformity and Regulatory Information
- Manufacturers Federal Communication Commission Declaration of Conformity Statement
- VCCI Statement for Japan
- Guidelines for Operating Cisco Catalyst Access Points in Japan
- Statement 371—Power Cable and AC Adapter
- Industry Canada
- Canadian Compliance Statement
- European Community, Switzerland, Norway, Iceland, and Liechtenstein
- Declaration of Conformity for RF Exposure
- Generic Discussion on RF Exposure
- This Device Meets International Guidelines for Exposure to Radio Waves
- This Device Meets FCC Guidelines for Exposure to Radio Waves
- This Device Meets the Industry Canada Guidelines for Exposure to Radio Waves
- Cet appareil est conforme aux directives internationales en matière d'exposition aux fréquences radioélectriques
- Additional Information on RF Exposure
- Administrative Rules for Cisco Catalyst Access Points in Taiwan
- Operation of Cisco Catalyst Access Points in Brazil
- Declaration of Conformity Statements
- Communications, Services, and Additional Information
- Cisco Bug Search Tool

13
Cisco Catalyst 9120AX Series Access Points
10 Powering the Access Point
The AP can be powered only through Power-over-Ethernet (PoE) using the following:
802.3at Cisco Power Injector AIR-PWRINJ6=
802.3af Cisco Power Injector AIR-PWRINJ5=
Note If AIR-PWRINJ5 is used, both the 2.4 GHz and 5 GHz radios will be reduced to 2x2 and Ethernet is
downgraded to 1 GbE. The USB port will also be off.
Any 802.3at (30.0 W) compliant switch port
11 Configuring and Deploying the Access Point
This section describes how to connect the access point to a wireless LAN controller. Because the configuration process
takes place on the controller, see the Cisco Wireless LAN Controller Configuration Guide for additional information.
The Controller Discovery Process
The access point uses standard Control and Provisioning of Wireless Access Points Protocol (CAPWAP) to communicate
between the controller and other wireless access points on the network. CAPWAP is a standard, inter-operable protocol
which enables an access controller to manage a collection of wireless termination points. The discovery process using
CAPWAP is identical to the Lightweight Access Point Protocol (LWAPP) used with previous Cisco Catalyst access points.
LWAPP-enabled access points are compatible with CAPWAP, and conversion to a CAPWAP controller is seamless.
Deployments can combine CAPWAP and LWAPP software on the controllers.
The functionality provided by the controller does not change except for customers who have Layer 2 deployments, which
CAPWAP does not support.
In a CAPWAP environment, a wireless access point discovers a controller by using CAPWAP discovery mechanisms and
then sends it a CAPWAP join request. The controller sends the access point a CAPWAP join response allowing the
access point to join the controller. When the access point joins the controller, the controller manages its configuration,
firmware, control transactions, and data transactions.
Note For additional information about the discovery process and CAPWAP, see the Cisco Wireless LAN Controller
Software Configuration Guide. This document is available on Cisco.com.
Note CAPWAP support is provided in controller software release 5.2 or later. However, your controller must be
running the release that supports 9120AX series access points, as specified in the access point data sheet.
Note You cannot edit or query any access point using the controller CLI if the name of the access point contains a
space.
Note Make sure that the controller is set to the current time. If the controller is set to a time that has already
occurred, the access point might not join the controller because its certificate may not be valid for that time.