
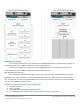
Specifications


A Principled Technologies test report 18
Cisco UCS B200 M3 Blade Server:
Uncompromised virtual desktop performance
3. On the Troubleshooting Mode Options screen, select Enable ESXi Shell, and press Enter.
4. Select Enable SSH, press Enter, and press Esc.
5. On the System Customization screen, select Configure Management Network.
6. On the Configure Management Network screen, select IP Configuration.
7. On the IP Configuration screen, select Set static IP; enter an IP address, subnet mask, and default gateway; and
press Enter.
8. On the Configure Management Network screen, press Esc. When asked if you want to apply the changes, press
Y.
9. Log into infra as root with the vSphere client.
10. Select the Configuration tab, and click Networking.
11. Configure vSwitch0 by clicking Add Networking…
12. Click the Network Adaptors tab.
13. Click Add…
14. Select vmnic1, and click Next.
15. Position vmnic0 as active and vmnic1 as a standby, and click OK.
16. Click the Ports tab and edit the vSwitch.
17. Change the number of ports to 512, and click OK.
18. In the vSwitch0 properties, click Add…
19. Create a virtual machine network called VDI-NET with a VLAN ID of 100 click Next, and click Finish.
Configuring ESXi after installation (DNS, and NTP)
1. Select the Configuration tab, and click Time configuration.
2. Select Properties, and click Options.
3. In the General settings, select Start automatically if any ports are open, and Stop when all ports are closed.
4. In the NTP settings, add a reliable NTP server, or use DC1.view5.com.
5. Close NTP settings.
6. Select the Configuration tab, and click DNS and routing.
7. Type SUT for name, and view5.com for domain.
8. Enter 172.0.0.10 for preferred DNS.
9. Close DNS.
Adding the ESXi servers to the EMC storage group
1. Open EMC Navsphere.
2. Log in as sysadmin
3. Click hosts, and under storage groups, click the VDI storage group, and click Properties.
4. In the Storage Group Properties box, click the Hosts tab.
5. Add infra and SUT, and click OK.
6. Reboot both ESXi servers.
Creating the ESXi datastore (SSD)
1. Log into infra as root with the vSphere client.
2. Click Configuration tabStorageAdd Storage.
3. Select LUN0, and click Next.
4. Select VMFS-5, and click Next.
5. Review the disk layout, and click Next.
6. For Datastore name, type SSD and click Next.
7. For Capacity, select Maximum available space, and click Next.
8. Click Finish to create the datastore.