
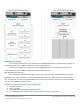
Specifications


A Principled Technologies test report 16
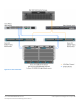
Cisco UCS B200 M3 Blade Server:
Uncompromised virtual desktop performance
5. Select Enclosure 0, Disk 10 and 11, and click OK.
6. Click StorageStorage ConfigurationStorage Pools.
7. Click RAID Groups, and click Create.
8. Create storge.
9. In the General tab, select RAID 0.
10. In the General tab, for disks, click Manual and select Disk enclosure 0, SSD disks 4, 5 and 6, and click Apply.
11. Click Create.
12. In the General tab, select RAID 5.
13. In the General tab, for disks, click Manual, and select Disk enclosure 0:
a. Disk enclosure 0: SSD disks 7, 8, 9
b. Disk enclosure 1: SAS disks 0-19
14. In the Advanced tab, select the check box next to FAST Cache Enabled, and click OK.
Provisioning LUNS
1. Open Storage LUNs.
2. Click Create:
a. For Storage pool type, click RAID group.
b. For Storage pool for new LUN=, select 0.
c. For Capacity, type 271.00 GB.
d. For LUN ID, select 0.
e. For Name, type SSD and click Apply.
3. Click Create:
a. For storage pool type, click RAID group.
b. For storage pool for new LUN, =select pool0.
c. For capacity, type 500.00 GB.
d. For number of LUNS to create, select 4.
e. For Name, type LUN and for starting ID, type 1 and click Apply.
Creating a storage group
1. Click Hosts, and under Storage groups, click Create.
2. For Storage Group Name, type VDI and click OK.
3. Open the storage group VDI.
4. Click the LUNs tab.
5. Expand SPA, and highlight LUN1-4 and SSD. Click Add, and click Apply.
6. Click OK to confirm, and click OK to exit.
Setting up the infrastructure server (infra), and server under test (SUT)
BIOS settings
We used Cisco UCS Firmware Manager to set all UCS firmware to version 2.0(2a).
Installing VMware vSphere 5 (ESXi) on the Cisco UCS B200 M2 (infra)
1. Insert the ESXi 5.0 disk, and select Boot from disk.
2. On the Welcome screen, press Enter.
3. On the End User License Agreement (EULA) screen, press F11.
4. On the Select a Disk to install or Upgrade screen, select the relevant volume to install ESXi on, and press Enter.
5. On the Please Select a Keyboard Layout screen, press Enter.
6. On the Enter a Root Password screen, assign a root password, and confirm it by entering it again. Press Enter to
continue.
7. On the Confirm Install screen, press F11 to install.