
User Manual
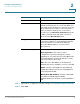
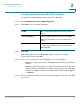
Table Of Contents
- Introduction
- Configuring Networking
- Configuring the Wireless Network
- Configuring the Firewall
- Configuring VPN
- Configuring Quality of Service (QoS)
- Administering Your Cisco RV110W
- Setting Password Complexity
- Configuring User Accounts
- Setting the Session Timeout Value
- Configuring Simple Network Management (SNMP)
- Using Diagnostic Tools
- Configuring Logging
- Configuring Bonjour
- Configuring Date and Time Settings
- Backing Up and Restoring the System
- Upgrading Firmware or Change the Language
- Restarting the Cisco RV110W
- Restoring the Factory Defaults
- Running the Setup Wizard
- Viewing the Cisco RV110W Status
- Using Cisco QuickVPN
- Where to Go From Here

Configuring Networking
Configuring the LAN Settings
Cisco RV110W Administration Guide 30
2
Changing the Default Cisco RV110W IP Address
To configure the default LAN IP address of the Cisco RV110W:
STEP 1 Choose Networking > LAN > LAN Configuration.
STEP 2 In the IPv4 section, enter this information:
STEP 3 Click Save.
After changing the Cisco RV110W LAN IP address, your PC is no longer
connected to the Cisco RV110W.
STEP 4 To reconnect your PC to the Cisco RV110W, do one of the following:
• If DHCP is configured on the Cisco RV110W, release and renew your PC IP
address.
• Manually assign an IP address to your PC. The address must be on the same
subnet as the Cisco RV110W. For example, if you change the Cisco RV110W
IP address to 10.0.0.1, assign your PC an IP address in the range of 10.0.0.2
to 10.0.0.255.
STEP 5 Open a new browser window and enter the new IP address of the Cisco RV110W
to reconnect.
VLAN Choose the VLAN number from the drop-down
menu.
Local IP Address Enter the LAN IP address of the Cisco RV110W.
Make sure the address is not in use by another
device.
Subnet mask Choose the subnet mask for the new IP address
from the drop-down menu. The default subnet is
255.255.255.0.