
User Manual
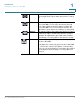
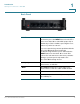
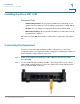
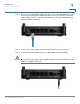
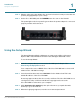

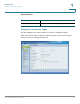
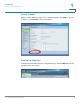
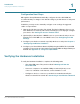
Table Of Contents
- Introduction
- Configuring Networking
- Configuring the Wireless Network
- Configuring the Firewall
- Configuring VPN
- Configuring Quality of Service (QoS)
- Administering Your Cisco RV110W
- Setting Password Complexity
- Configuring User Accounts
- Setting the Session Timeout Value
- Configuring Simple Network Management (SNMP)
- Using Diagnostic Tools
- Configuring Logging
- Configuring Bonjour
- Configuring Date and Time Settings
- Backing Up and Restoring the System
- Upgrading Firmware or Change the Language
- Restarting the Cisco RV110W
- Restoring the Factory Defaults
- Running the Setup Wizard
- Viewing the Cisco RV110W Status
- Using Cisco QuickVPN
- Where to Go From Here
Introduction
Using the Setup Wizard
Cisco RV110W Administration Guide 15
1
STEP 6 Plug the other end of the adapter into an electrical outlet. You may need to attach a
specific plug (supplied) for your country.
STEP 7 On the Cisco RV110W, push the POWER button in to turn on the firewall.
The power light on the front panel is green when the power adapter is connected
properly and the unit is turned on.
Using the Setup Wizard
The Setup Wizard and Device Manager are supported on Microsoft Internet
Explorer 6.0 or later, Mozilla Firefox 3.0 or later, and Apple Safari 3.0 or later.
To u s e t h e S e t u p W i z a r d :
STEP 1 Start the computer that you connected to the LAN1 port in Step 2 of the
Connecting the Equipment section.
Your computer becomes a DHCP client of the Cisco RV110W and receives an IP
address in the 192.168.1.xxx range.
STEP 2 Launch a web browser and enter 192.168.1.1 in the Address bar. This is the
default IP address of the Cisco RV110W.
A message appears about the site security certificate. The Cisco RV110W uses a
self-signed security certificate and this message appears because the
Cisco RV110W is not known to your computer.
STEP 3 Click Continue to this website (or the option shown on your particular web
browser) to go to the web site.
STEP 4 When the login page appears, enter the user name and password.