
User Manual
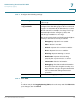
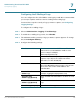
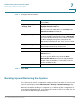
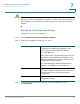
Table Of Contents
- Introduction
- Configuring Networking
- Configuring the Wireless Network
- Configuring the Firewall
- Configuring VPN
- Configuring Quality of Service (QoS)
- Administering Your Cisco RV110W
- Setting Password Complexity
- Configuring User Accounts
- Setting the Session Timeout Value
- Configuring Simple Network Management (SNMP)
- Using Diagnostic Tools
- Configuring Logging
- Configuring Bonjour
- Configuring Date and Time Settings
- Backing Up and Restoring the System
- Upgrading Firmware or Change the Language
- Restarting the Cisco RV110W
- Restoring the Factory Defaults
- Running the Setup Wizard
- Viewing the Cisco RV110W Status
- Using Cisco QuickVPN
- Where to Go From Here

Administering Your Cisco RV110W
Configuring Logging
Cisco RV110W Administration Guide 125
7
STEP 4 Configure the following settings:
STEP 5 Click Save.
To edit an entry in the Logging Setting Table, select the entry and click Edit. Make
your changes, then click Save.
Remote Log Server Enter the IP address of the log server that will
collect logs.
Log Severity for Local
Log and Email
Click to choose the severity of logs you want to
configure. Note that all log types above a selected
log type are automatically included and you cannot
deselect them. For example, choosing “error” logs
automatically includes emergency, alert, and
critical logs in addition to error logs.
The event severity levels are listed from the highest
severity to the lowest severity, as follows:
• Emergency—System is not usable.
• Alert—Action is needed.
• Critical—System is in a critical condition.
• Error—System is in error condition.
• Warning—System warning occurred.
• Notification—System is functioning
properly, but a system notice occurred.
• Information—Device information.
• Debugging—Provides detailed information
about an event. Choosing this severity uses
large amounts of logs to be generated and is
not recommended during normal router
operation.
Enable To enable these logging settings, check this box.