
Specifications


73
OL-4923-01 B0
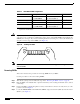
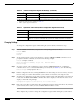
Step 5 Open the SIMM socket release levers on the SIMM to release the SIMM from the socket. (See
Figure 14.) The SIMM is under tension in the socket; therefore, the SIMM might be released from the
socket with some force.
Figure 14 Using the SIMM Socket Release Levers to Remove a SIMM
Step 6 With the SIMM socket tabs open, grasp the ends of the SIMM between your thumbs and forefingers and
pull the SIMM completely out of the socket.
Step 7 Place the removed SIMM on an antistatic mat, and store it in an antistatic container to protect it from
ESD damage.
Step 8 Repeat Step 4 through Step 7 for the remaining SIMM, if required for your upgrade.
This completes the SIMM removal procedure. Proceed to the next section to install the new SIMMs.
Installing New SIMMs
This section discusses the procedure for installing SIMMs on your RSP.
Use this procedure to install new SIMMs.
Note Do not mix memory sizes. If installing two SIMMs, both SIMMs must be the same size.
Step 1 Remove the new SIMM from its antistatic container.
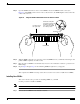
Polarization notch
DRAM SIMM
Pull the tabs away with
your thumbs, bracing your
forefingers against the
posts. Raise the SIMM
to a vertical position.
H2017
Faceplate edge of
the system card