
Specifications

Implementing OSPF on Cisco IOS XR Software
How to Implement OSPF on Cisco IOS XR Software
RC-285
Cisco IOS XR Routing Configuration Guide
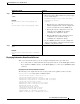
Step 5
exit
Example:
RP/0/RP0/CPU0:router(config-ospf-ar)# exit
Enters OSPF configuration mode.
Step 6
vrf
vrf-name
Example:
RP/0/RP0/CPU0:router(config-ospf)# vrf vrf1
Creates a VRF instance and enters VRF configuration
mode.
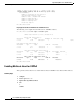
Step 7
area
area-id
Example:
RP/0/RP0/CPU0:router(config-ospf-vrf)# area 0
Enters area configuration mode and configures an area for a
VRF instance under the OSPF process.
• The area-id argument can be entered in dotted-decimal
or IPv4 address notation, such as area 1000 or
area 0.0.3.232. However, you must choose one form or
the other for an area.
Step 8
interface
type instance
Example:
RP/0/RP0/CPU0:router(config-ospf-vrf)#
interface POS 0/0/0/0
Enters interface configuration mode and associates one or
more interfaces to the VRF.
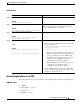
Step 9
end
or
commit
Example:
RP/0/RP0/CPU0:router(config-ospf-ar-if)# end
or
RP/0/RP0/CPU0:router(config-ospf-ar-if)# commit
Saves configuration changes.
• When you issue the end command, the system prompts
you to commit changes:
Uncommitted changes found, commit them before
exiting(yes/no/cancel)?
[cancel]:
–
Entering yes saves configuration changes to the
running configuration file, exits the configuration
session, and returns the router to EXEC mode.
–
Entering no exits the configuration session and
returns the router to EXEC mode without
committing the configuration changes.
–
Entering cancel leaves the router in the current
configuration session without exiting or
committing the configuration changes.
• Use the commit command to save the configuration
changes to the running configuration file and remain
within the configuration session.
Command or Action Purpose