
User guide


6
Installation
Business Internet Video Camera with Audio
Chapter 4
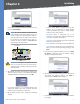
Linksys One Wireless Network
Example Linksys One Wireless Network
Hardware Installation
NOTE: Before attaching the camera extension or
swivel head, the stand base can be mounted in
a permanent location by using three screws to
secure the stand base to the desired location.
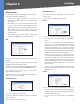
The Camera stand can be connected two different
ways:
Attach the stand base to the camera extension and
attach the camera extension to the swivel head.
Stand Base
Camera Extension
Swivel Head
Locknut
You can connect the swivel head directly to the stand
base if the extension isn’t necessary.
Stand Base
Swivel Head
1.
•
•
Connect the camera stand to the bottom of the
camera. Adjust the camera to the appropriate viewing
position.
Locknut
Once the camera is positioned properly, secure the
camera in place by tightening the locknut.
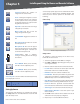
Connect the included Ethernet network cable to your
network router or switch.
LINK/ACT
PoE
LINK/ACT
PoE LINK/ACT
Gigabit
LINK/ACT
Gigabit
Connect the other end of the cable to the Camera’s
Ethernet port.
LEDs
Link PoE
If your network switch provides Power over Ethernet
to the Camera, verify the Camera’s LEDs are lit and skip
steps 5-7.
Connect the included power adapter to the Camera’s
Power port and plug the other end into a standard
electrical outlet.
2.
3.
4.
5.