
Installation Guide


4027869 Rev A 11
Configuring the Chassis
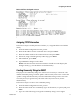
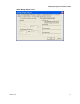
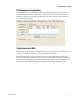
Main Serial/Telnet Configuration Screen
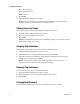
Assigning TCP/IP Information
Follow these steps to modify the Saved Values (i.e., assign IP address and subnet
mask).
1 From the Main Configuration screen, press I.
2 Enter the IP address for the connected device and press Enter.
3 Enter the subnet mask for the connected device and press Enter.
4 If desired, assign a default gateway OR to skip, press Enter.
5 When finished, press Enter.
6 Type reboot for changes to take effect.
Result: The Saved Values and Current Values should now both display the
changes made (e.g., new IP address and subnet mask).
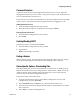
Creating Community Strings for SNMP
The purpose of community strings is to add a level of security to a network. The
default community string is named "public" and has read/write access. Delete the
“public” string and add necessary custom communities strings such as one with
read-only access (for general use), the other with read/write access (for the
administrator).
Follow these steps to create a new community string.
1 From the Main Configuration screen, press C.
2 Enter the name of the new community (up to 16 characters, no spaces) and press
Enter.
3 Type one of the following to assign the community string’s access rights.