
Installation Guide


4030542 Rev B 31
Using the Main Configuration Screen
Note: Reboot the Mini FiberLinX-II for changes to take effect. To reboot, type reboot
at the prompt on the main configuration screen, or press
Delete or F2 to power-cycle
the chassis. Any changes to the configuration may result in a momentary loss of
connection.
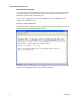
Command List
I = Enter New Saved Parameter Values
P = Change Password
T = New Trap Destination
K = Remove ALL Trap Destinations
C = New Community String
U = Delete ALL Community Strings
E = End Session
Reboot = Reboots the Mini FiberLinX-II
D = Enable/disable DHCP
Space = Device Specific Configuration Options
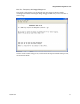
To Assign TCP/IP Information
Complete the following steps to modify the Saved Parameter Values (i.e., assign IP
address and subnet mask).
1 Press
I, type the IP address, and then press Enter. The cursor moves to the
subnet mask field.
2 Type the subnet mask for the connected device, and then press
Enter. The cursor
moves to the default gateway field.
3 Type the default gateway, or press
Enter to skip.
4 Press Enter, and then type
reboot to reboot the module. The TCP/IP information
changes goes into effect following reboot.
Note: The Current Values can only be saved and acted on after the Mini FiberLinX-II
has been successfully rebooted.
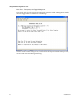
To Password-Protect Serial Port Connections
Password protection is provided for the serial configuration process by pressing P
on the main configuration screen. Enter a password, keeping in mind that passwords
are case-sensitive and must not exceed eight characters or include spaces, and press
Enter. This password will be requested whenever logging on. To remove password
protection, select P and, instead of entering a password, press Enter. If a password
becomes lost, contact Cisco Services for your area. See
For Information (on page 62).