
Installation guide


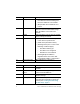
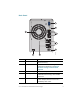
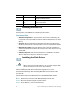
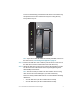
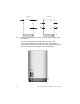
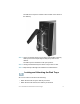
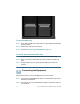
Table Of Contents
- Before You Begin
- Getting to Know the NSS322
- Installing the NSS322
- Installing the Disk Drives
- Locking and Unlocking the Disk Trays
- Connecting the Equipment
- Verifying the Hardware Installation
- Starting NAS Configuration
- Mapping a Network Drive
- Installing the Client Utility for Windows
- Installing the Client Utility for Mac
- Accessing the Management GUI Using a Web Browser
- Suggested Next Steps
- Reset Network Settings and Password
- Inline Power Switch Module
- Where to Go From Here

Cisco Small Business NSS322 Smart Storage 7
To remove the disk tray, push the silver tab down to unlock the tray,
and push the lower tab to release the tray lever. Using the tray
lever, pull the tray out.
NOTE If your device has the disk drives already installed, continue to
the next section, Connecting the Equipment, page 10.
STEP 4 Position the disk drive into a disk tray. The electrical connectors of
the disk drive must face toward the back of the drive tray.
STEP 5 Attach the disk drive to the tray by inserting the disk drive screws
into the four holes at the bottom of the tray and tightening them
with a Phillips screwdriver.
NOTE Use the screws provided in the box with the device. Using
other screws can cause damage to your disk or disk tray.
There are clearly marked disk holes to accommodate the following
disk drives:
• 3.5-inch disk drive (use the included silver screws)
• 2.5-inch disk drive (use the included black screws)
277587
LAN
HDD2
HDD1
eSATA
NSS 322
Smart Storage