
Installation guide


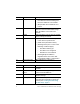
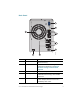
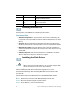
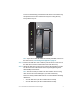
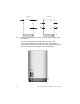
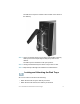
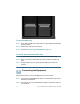
Table Of Contents
- Before You Begin
- Getting to Know the NSS322
- Installing the NSS322
- Installing the Disk Drives
- Locking and Unlocking the Disk Trays
- Connecting the Equipment
- Verifying the Hardware Installation
- Starting NAS Configuration
- Mapping a Network Drive
- Installing the Client Utility for Windows
- Installing the Client Utility for Mac
- Accessing the Management GUI Using a Web Browser
- Suggested Next Steps
- Reset Network Settings and Password
- Inline Power Switch Module
- Where to Go From Here

6 Cisco Small Business NSS322 Smart Storage
Installing the NSS322
Please place your NSS322 on a desktop or flat surface.
Placement Tips
• Ambient Temperature—To prevent the device from overheating, do
not operate it in an area that exceeds an ambient temperature of 104°F
(40°C).
•Air Flow—Be sure that there is adequate air flow around the device.
Avoid any obstructions to air flow either in front of or behind the chassis.
• Mechanical Loading—Be sure that the device is level and stable to
avoid any hazardous conditions. Do not place any other devices on top
of the NAS.
•Vibration/Impacts—Be sure that the device is installed in a location
where it will not be subject to vibration or impact.
Installing the Disk Drives
CAUTION When storing unused disk drives, do not stack multiple disk
drives because this can cause drive failures.
When installing the disk drives, follow the suggestions in
Cisco
Electrostatic Discharge and Grounding Best Practices
, located on the
product CD.
Follow these steps to install disk drives in the NSS322 NAS chassis.
STEP 1 Remove the contents of the NAS package from the box.
STEP 2 Place the chassis upright on a flat surface.
STEP 3 From disk bay 1, remove the disk tray.
6 USB 2.0 (4) USB port for accessing USB attached
storage and UPS status.
7 Kensington Lock
Slot
Attach a Kensington lock to protect the
device from theft.
8Fan System fan.
Number Item Description
3
4