
Installation guide


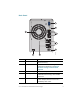
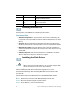
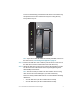
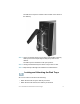
Table Of Contents
- Before You Begin
- Getting to Know the NSS322
- Installing the NSS322
- Installing the Disk Drives
- Locking and Unlocking the Disk Trays
- Connecting the Equipment
- Verifying the Hardware Installation
- Starting NAS Configuration
- Mapping a Network Drive
- Installing the Client Utility for Windows
- Installing the Client Utility for Mac
- Accessing the Management GUI Using a Web Browser
- Suggested Next Steps
- Reset Network Settings and Password
- Inline Power Switch Module
- Where to Go From Here

4 Cisco Small Business NSS322 Smart Storage
Number LED Indicator Description
1 HDD1, HDD2
• (Green) Flashes green when the disk
drive data is accessed. Solid green
when the disk drive is accessible.
• (Red) A hard drive read/write error
occurs.
LAN (Orange) Flashes when there is network
traffic to or from the NAS. Solid orange
when the NAS is connected to the
network.
eSATA (Orange) Flashes orange when an eSATA
device is being accessed.
2 Power
• (Off) Disk drives are in standby mode
or the device is powered off.
• (Solid Green) The NAS is ready.
• (Flashing Green) One or more of the
following conditions apply:
– The NAS is starting up.
– The NAS is not configured.
– Disk drive is not formatted.
• (Flashing Red) The NAS is in
degraded mode. One of the disk
drives failed in RAID 1 configuration.
3 One Touch Copy (Blue) USB device is detected.
Number Item Description
2 Power Button Press Power to power on or shutdown
the NAS.
3 One Touch Copy
Button
Press One Touch Copy to copy files to or
from an external USB drive.
4 USB 2.0 USB port for accessing external USB-
attached storage.
5 Disk Tray Lock Lift the silver tab up to lock the disk tray.
Press the silver tab down to unlock the
disk tray. See Locking and Unlocking
the Disk Trays, page 9.