
Installation guide

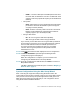
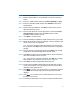
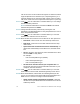
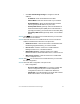
Table Of Contents
- Before You Begin
- Getting to Know the NSS322
- Installing the NSS322
- Installing the Disk Drives
- Locking and Unlocking the Disk Trays
- Connecting the Equipment
- Verifying the Hardware Installation
- Starting NAS Configuration
- Mapping a Network Drive
- Installing the Client Utility for Windows
- Installing the Client Utility for Mac
- Accessing the Management GUI Using a Web Browser
- Suggested Next Steps
- Reset Network Settings and Password
- Inline Power Switch Module
- Where to Go From Here

Cisco Small Business NSS322 Smart Storage 13
STEP 1 Insert the product CD. The Welcome to the Setup Wizard window
opens.
STEP 2 Under First Time Installation, click Start. The End-User License
Agreement window opens.
STEP 3 To accept the End-User License Agreement, check the I accept
this agreement check box and click Next. The First Time
Installation Wizard window opens.
STEP 4 Click Next to run the wizard.
STEP 5 From the Hardware Installation Guide window, select your model.
STEP 6 Follow the prompts to check the package contents, install the disk
drives, and connect the equipment.
NOTE If you have already installed the disk drives and connected
the equipment, click Skip until you reach the System Configuration
window.
STEP 7 From the System Configuration window, click Next to go to NAS
configuration. The NAS Configuration window opens.
STEP 8 Click Next. The Discovering the NAS window opens and advises
when the uninitialized device is found.
STEP 9 Click Next. The Web Configuration window opens.
STEP10 The First Time Installation Wizard detects the NAS and prompts
you to go through the web configuration process. From the drop-
down list, select a NAS device.
STEP11 Click Next to continue. You are directed to a configuration window
to complete the settings step by step. The Welcome window
displays.
STEP12 Click Next. You are redirected to a window where you can enter
the name for this server.
STEP13 In the Server Name field, enter a name to identify the NAS device.
The server name can be a maximum length of 14 characters, which
supports alphanumeric characters (a-z, 0-9) and hyphens (-). It is
required that the server name begin with a letter versus a number.
The server name does not accept names with a space or period (.)
STEP14 Click Next. You are redirected to a window where you can change
the administrator password.
NOTE The default administrator username is admin. The default
administrator password is admin.