
Installation guide


5-7
Cisco Network Convergence System 6000 Series Routers Hardware Installation Guide
Chapter 5 Installing Route Processor Cards, Line Cards, and Fabric Cards
Installing a Route Processor Card
Removing an Impedance Carrier
Prerequisites
Before performing this task, open the cosmetic doors, if installed.
Required Tools and Equipment
• Number-2 Phillips screwdriver or number-2 common (flat-head) screwdriver
Steps
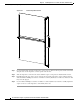
To remove an impedance carrier (Figure 5-2), perform the following steps:
Step 1 Identify the impedance carrier to be removed from the card cage. Use the number-2 Phillips screwdriver
or number-2 common (flat-head) screwdriver to turn the two captive screws on the front panel of the card
counterclockwise to loosen it from the slot.
Step 2 Grasp the impedance carrier handle with one hand and gently pull it halfway from the slot.
Step 3 Place one hand under the impedance carrier to guide it.
Step 4 Holding the impedance carrier underneath and by the handle, pull it from the slot, and set it carefully
aside.
Installing a Route Processor Card
• Installing an RP Card, page 5-7
• Verifying the Installation of an RP Card, page 5-10
Warning
Class 1 Laser Product.
Statement 113
Warning
Because invisible radiation may be emitted from the aperture of the port when no fiber cable is
connected, avoid exposure to radiation and do not stare into open apertures.
Statement 125
Installing an RP Card
Every Cisco NCS 6008 LCC contains two route processor (RP) cards in dedicated slots on the rear side
of the chassis. The RP cards are identical. One RP card installs into slot RP0 on the left of the card cage,
while the second RP card installs into slot RP1 on the right of the card cage.