
Installation guide


5-32
Cisco Network Convergence System 6000 Series Routers Hardware Installation Guide
Chapter 5 Installing Route Processor Cards, Line Cards, and Fabric Cards
Installing and Removing a Line Card
Step 3 Remove the LC from the antistatic bag.
Step 4 Use both hands while inserting a LC. Use one hand on the faceplate and the other hand along the base
of the LC to guide it into a slot.
Caution To prevent ESD damage, handle a LC by its ejector levers or the LC carrier edges only. Do
not touch any of the electrical components, pins, or circuitry.
Step 5 Orient the LC according to the up arrow on the faceplate. If the card does not slide easily into the slot,
the orientation may be wrong and the rejection flange is stopping the card from going into the slot.
Reorient the LC, if necessary.
Step 6 Make sure that the ejector levers are oriented properly to engage with the pin as the LC slides into the
slot. Carefully slide the LC into the slot until the ejector levers engage the catches, and then stop.
Step 7 Simultaneously pivot the ejector levers toward the faceplate of the LC. Do not force the LC; the ejector
levers properly seat the LC against the midplane.
Note If the captive screws are difficult to tighten, ensure that each ejector lever is properly secured to
each catch and that the LC is properly seated in the slot.
Step 8 Use a number-2 Phillips screwdriver or number-2 common (flat-head) screwdriver to tighten the captive
screws next to each LC ejector lever to ensure proper EMI shielding and prevent the LC from becoming
partially dislodged from the midplane.
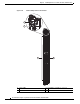
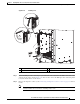
Step 9 Attach the vertical cable management bracket to the faceplate of the LC using the two screws that came
with it (Figure 5-1).
Verifying the Installation of a Line Card
Use the Status LED, located on the faceplate of the LC, to verify the correct installation of the LC:
• When the card is properly installed and no faults are detected, the card status LED turns green.
• When the card status LED is solid yellow, either software initialization is in progress during bootup
or a fault exists on the board.
• When the card status LED is blinking yellow, the card is not fully seated.
• When the card status LED is off, verify that the card is installed correctly. There could be no power
applied to the card, a power fault, or a hardware fault.
• Verify that there is power to the card by looking at the indicators on the power tray.
If the installed or replaced LC fails to operate or to power on after installation:
• Ensure that the card is seated firmly into the Cisco NCS 6008 chassis slot. One easy way to verify
physical installation is to see whether the front faceplate of the card is even with the fronts of the
other cards installed in the card cage.
• Ensure that the ejector levers are latched and that the captive screws are fastened properly. If you
are uncertain, unlatch the levers, loosen the screws, and attempt to reseat the card.
• Examine the power system to see whether the chassis is receiving power.