
Installation guide


5-15
Cisco Network Convergence System 6000 Series Routers Hardware Installation Guide
Chapter 5 Installing Route Processor Cards, Line Cards, and Fabric Cards
Installing Fabric Cards
Step 6 Carefully slide the FC into the slot until the ejector levers meet the edges of the card cage, and then stop
when the ejector lever hooks catch the card cage. If they do not catch, try reinserting the FC until the
ejector lever hooks are fully latched.
Step 7 To seat the card in the midplane connector, grasp both card ejector levers and pivot them inward toward
the handle in the card carrier until they are flush against the front edge of the card carrier.
Note New Installation Only. Do not tighten any fabric cards until all cards have been inserted and
seated. For maintenance and/or replacement of a failed FC card, only loosen or tighten the FC
card being replaced.
TIMESAVER: We recommend that you install the FC cards from either left to right or right to left to
avoid wedging a new FC card between two seated FC cards.
a. Repeat steps 2 through 10 for all remaining FC cards.
Step 8 Use the number-2 Phillips screwdriver or number-2 common (flat-head) screwdriver to turn the two
captive screws on the front panel of the card clockwise to seat the card firmly in the slot.
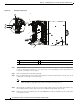
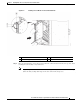
Step 9 Attach the vertical cable management bracket to the faceplate of the FC using the two screws that came
with it (Figure 5-1).