
Installation guide


5-14
Cisco Network Convergence System 6000 Series Routers Hardware Installation Guide
Chapter 5 Installing Route Processor Cards, Line Cards, and Fabric Cards
Installing Fabric Cards
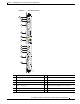
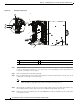
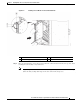
Figure 5-5 Installing a Fabric Card
Step 1 Attach the ESD-preventive wrist strap to your wrist and connect its leash to one of the two ESD jacks
on the rear side of the chassis (Figure 2-4). You can also connect the ESD-preventive wrist strap leash
to any bare metal surface on the chassis.
Step 2 Remove the FC from its antistatic packaging.
Step 3 Place one hand under the card to support and position the card for insertion into the card cage slot. Avoid
touching the card circuitry or any connectors.
Note Alignment grooves exist on each slot in the card cage. When you install a card in the card cage,
make sure that you align both edges of the card carrier in the slot grooves.
Step 4 Orient the FC according to the up arrow on the faceplate. If the card does not slide easily into the slot,
the orientation may be wrong or the slot is not for an FC. Reorient the FC, if necessary.
Step 5 If the ejector levers are locked in place, press the OIR buttons on the top and bottom of the card faceplate
to release the ejectors.
1 Ejector lever 3 Captive screw
2 OIR button
1
2
3
347729