
Specifications


© 2006 Cisco Systems, Inc.
All rights reserved.
System Admin 4-12
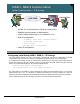
NAM / Traffic Analyzer v3.5 Tutorial
© 2006 Cisco Systems, Inc. All rights reserved.
Sys tem Admin 4-12
NAM / Traffic Analyzer v3.5 Tutorial
NAM-1, NAM-2 Administration
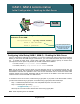
Initial Configuration – Enabling the Web Server
NAM-1, NAM-2 Administration
Initial Configuration – Enabling the Web Server
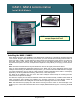
Before using NAM Traffic Analyzer software, first enable the
web server on the NAM:
Root@localhost# ip http server enable
Enter a web username:
Enter a password:
Before using NAM Traffic Analyzer software, first enable the
web server on the NAM:
Root@localhost# ip http server enable
Enter a web username:
Enter a password:
NAM
NAM
HTTP/HTTPS
You will be prompted for the
web username and password
when logging into the web
interface of the NAM
You will be prompted for the
web username and password
when logging into the web
interface of the NAM
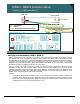
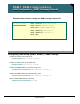
Configuring Initial Setup (NAM-1, NAM-2) – Enabling the Web Server
After you configure the NAM with an IP address, you can then communicate with the NAM over the network.
Before you can access the NAM through a web browser, you must enable the NAM’s web server using the
CLI. To enable the Web server, choose either HyperText Transfer Protocol (HTTP) or Secure HTTP
(HTTPS) as the access protocol. By default, the HTTPS commands are disabled.
For HTTP, use the ip http server enable command.
For HTTPS, use the ip http secure server enable command.
Note: You can also select to run the server on a port other than TCP 80. If you change the HTTP port, you
must restart the server. After entering the command to enable the server, you will then be queried for a Web
administration username and password. This is the account information used to access the NAM Traffic
Analyzer software via a browser. Remember that the CLI account for the NAM is not a Web account and
cannot be used to access the NAM via a Web browser.
To enable the HTTP secure server, install a strong crypto patch. If you prefer to use SSH instead of Telnet,
you also must install a strong crypto patch. To install a strong crypto patch, follow these steps:
Step 1 Download the patch from Cisco.com and publish the patch on an FTP server.
Step 2 Install the patch by entering:
root@localhost# patch ftp-url
Where ftp-url is the FTP location and the name of the strong crypto patch.
Note: These steps are generic to all NAMs