
Specifications


© 2006 Cisco Systems, Inc.
All rights reserved.
Scenarios 3-36
NAM / Traffic Analyzer v3.5 Tutorial
© 2006 Cisco Systems, Inc. All rights reserved.
Scenarios 3-36
NAM / Traffic Analyzer v3.5 Tutorial
Scenario 3
Enable DiffServ Monitoring
Scenario 3
Enable DiffServ Monitoring
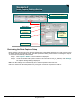
Enable DiffServ statistics for
the created profile on VLAN 100
(main VLAN for server farm).
Enable DiffServ statistics for
the created profile on VLAN 100
(main VLAN for server farm).
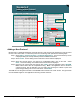
Enable
Collection
Statistics
Enable
Collection
Statistics
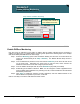
Setup > Monitor > DiffServ > Monitoring
Enable DiffServ Monitoring
Like other types of collections on the NAM, no DiffServ data is actually collected until the monitoring is
enabled on a data source. To enable DiffServ monitoring, Dean performs the following steps on the Catalyst
6500 Series NAM (NM-NAM follows the same steps):
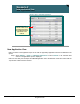
Step 1. Select the Monitoring option under the DiffServ heading from the menu on the left side of the
screen (you should already be at Setup > Monitor). The DiffServ Monitor Setup screen is
displayed.
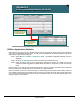
Step 2. From the Data Source pull-down menu, Dean selects VLAN 100. (VLAN 100 is the main VLAN
for the server farm. Remember, the span source is still port Gi1/2, which connects the
distribution switch to the server farm workgroup access switch.)
Step 3. From the DiffServ Profile pull-down list, select QoSsearch (the profile just created).
Step 4. Enable all types of statistics collections. Note: You can change the number of applications and
hosts the NAM collects statistics for by selecting 100, 500, or Max Possible from the associated
Max Entries pull-down list.
Step 5. Click Apply to enable the collection of traffic, application, and host statistics based on the
DSCP values for all packets on port Gi1/2, VLAN 100.
Dean is now ready to look at the traffic based on DSCP values.