
Specifications


© 2006 Cisco Systems, Inc.
All rights reserved.
Scenarios 3-7
NAM / Traffic Analyzer v3.5 Tutorial
© 2006 Cisco Systems, Inc. All rights reserved.
Scenarios 3-7
NAM / Traffic Analyzer v3.5 Tutorial
Scenario 1
Accessing the NAM
Scenario 1
Accessing the NAM
Enter user account
information created during
the installation of the NAM
Enter user account
information created during
the installation of the NAM
NAM Performance
Metrics
NAM Performance
Metrics
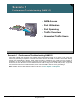
Accessing the NAM
Dean can access the embedded web server and Traffic Analyzer software in the NAM with his web browser
and the IP address or host name of the NAM as the URL; for example, http://192.168.159.118. However, if
Dean had assigned a TCP port number other than 80 during configuration, then he would need to append
that port number to the end of the URL and use a colon to separate the port number from the address or host
name (that is, http:// 192.168.159.118 :88).
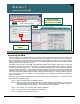
After Dean enters the URL for his NAM, he is presented with the Traffic Analyzer login screen. He logs into
the NAM server using the account information that he defined during installation (see Chapter 4 for more
details) and clicks the Login button. The Traffic Analyzer authenticates his login information and displays
the System Resources metrics. Dean reviews the System Resources metrics to ensure that the NAM has
sufficient memory and CPU to accommodate his monitoring tasks because he knows that lack of memory or
CPU could mean that the NAM might inaccurately collect and report statistics. If resource utilization rises too
high, he knows to reduce the number of monitoring tasks he has configured to relieve the performance
burden on the NAM.
At this time, Dean could create additional user accounts with specific access privileges. To create new users,
Dean performs the following steps:
Step 1. Select the Admin tab, if not already selected.
Step 2. Select the Users option located under the set of tabs displaying NAM functions. A new menu of
options is displayed on the left side. Ensure that Local Database is selected (select TACACS+
if using TACACS+ for authentication). A list of current users is displayed.
Step 3. Click Create. The User Information dialog is displayed.
Step 4. Enter user account name, password, and privileges.
Step 5. Click Submit to create the new user.